Tired of navigating that pile of shoes and bags the second you walk through the door? Turning an underused closet into a functional mudroom is a fantastic, space-saving solution that finally creates a dedicated drop zone for all that daily clutter. It's a popular and practical upgrade that adds serious function and value, all without the price tag of a full-blown home addition.
Why This Project Will Transform Your Entryway
That small, often-forgotten closet near your front or back door holds more potential than you might think. This isn't just about adding more storage; it’s about creating a smoother, more organized transition from the outside world into your home. A closet-to-mudroom conversion tackles the universal problem of chaotic entry points head-on, giving you a stylish and incredibly useful spot for coats, shoes, backpacks, and keys.
This project brings a sense of order to your daily grind. Instead of tripping over shoes or seeing jackets tossed over chairs, everything finally has a designated home. It’s a small change that makes a huge difference in your home's overall tidiness—and your sanity.
The Value of a Smart Upgrade
If you're looking for better home organization, you're in good company. The trend to convert closet to mudroom is booming. In fact, search interest for 'mudroom ideas' shot up by 40–60% between 2019 and 2023. This reflects a larger shift toward making every square foot of our homes work harder, with the US home organizers market projected to hit USD 12.05 billion by 2025.
A DIY conversion can often be done for under $500, a massive saving compared to a home addition. On top of that, closet renovations frequently deliver an impressive 83% return on investment. For more insights on this trend, you can explore resources like ai-stager.com.
A well-planned mudroom conversion is more than just a weekend project—it's an investment in your home's daily efficiency and market appeal. It streamlines departures and arrivals, making hectic mornings and tired evenings a little bit easier for everyone.
Visualize Your Future Mudroom
Before you grab a hammer, take a moment to visualize the end result. This is a crucial first step that builds confidence and ensures the final design actually meets your family's needs. Playing around with design tools can help you picture different layouts, colors, and storage combinations in your specific closet space.
This image shows a beautifully finished mudroom conversion, proving how a simple bench, some hooks, and updated flooring can completely redefine a small area.
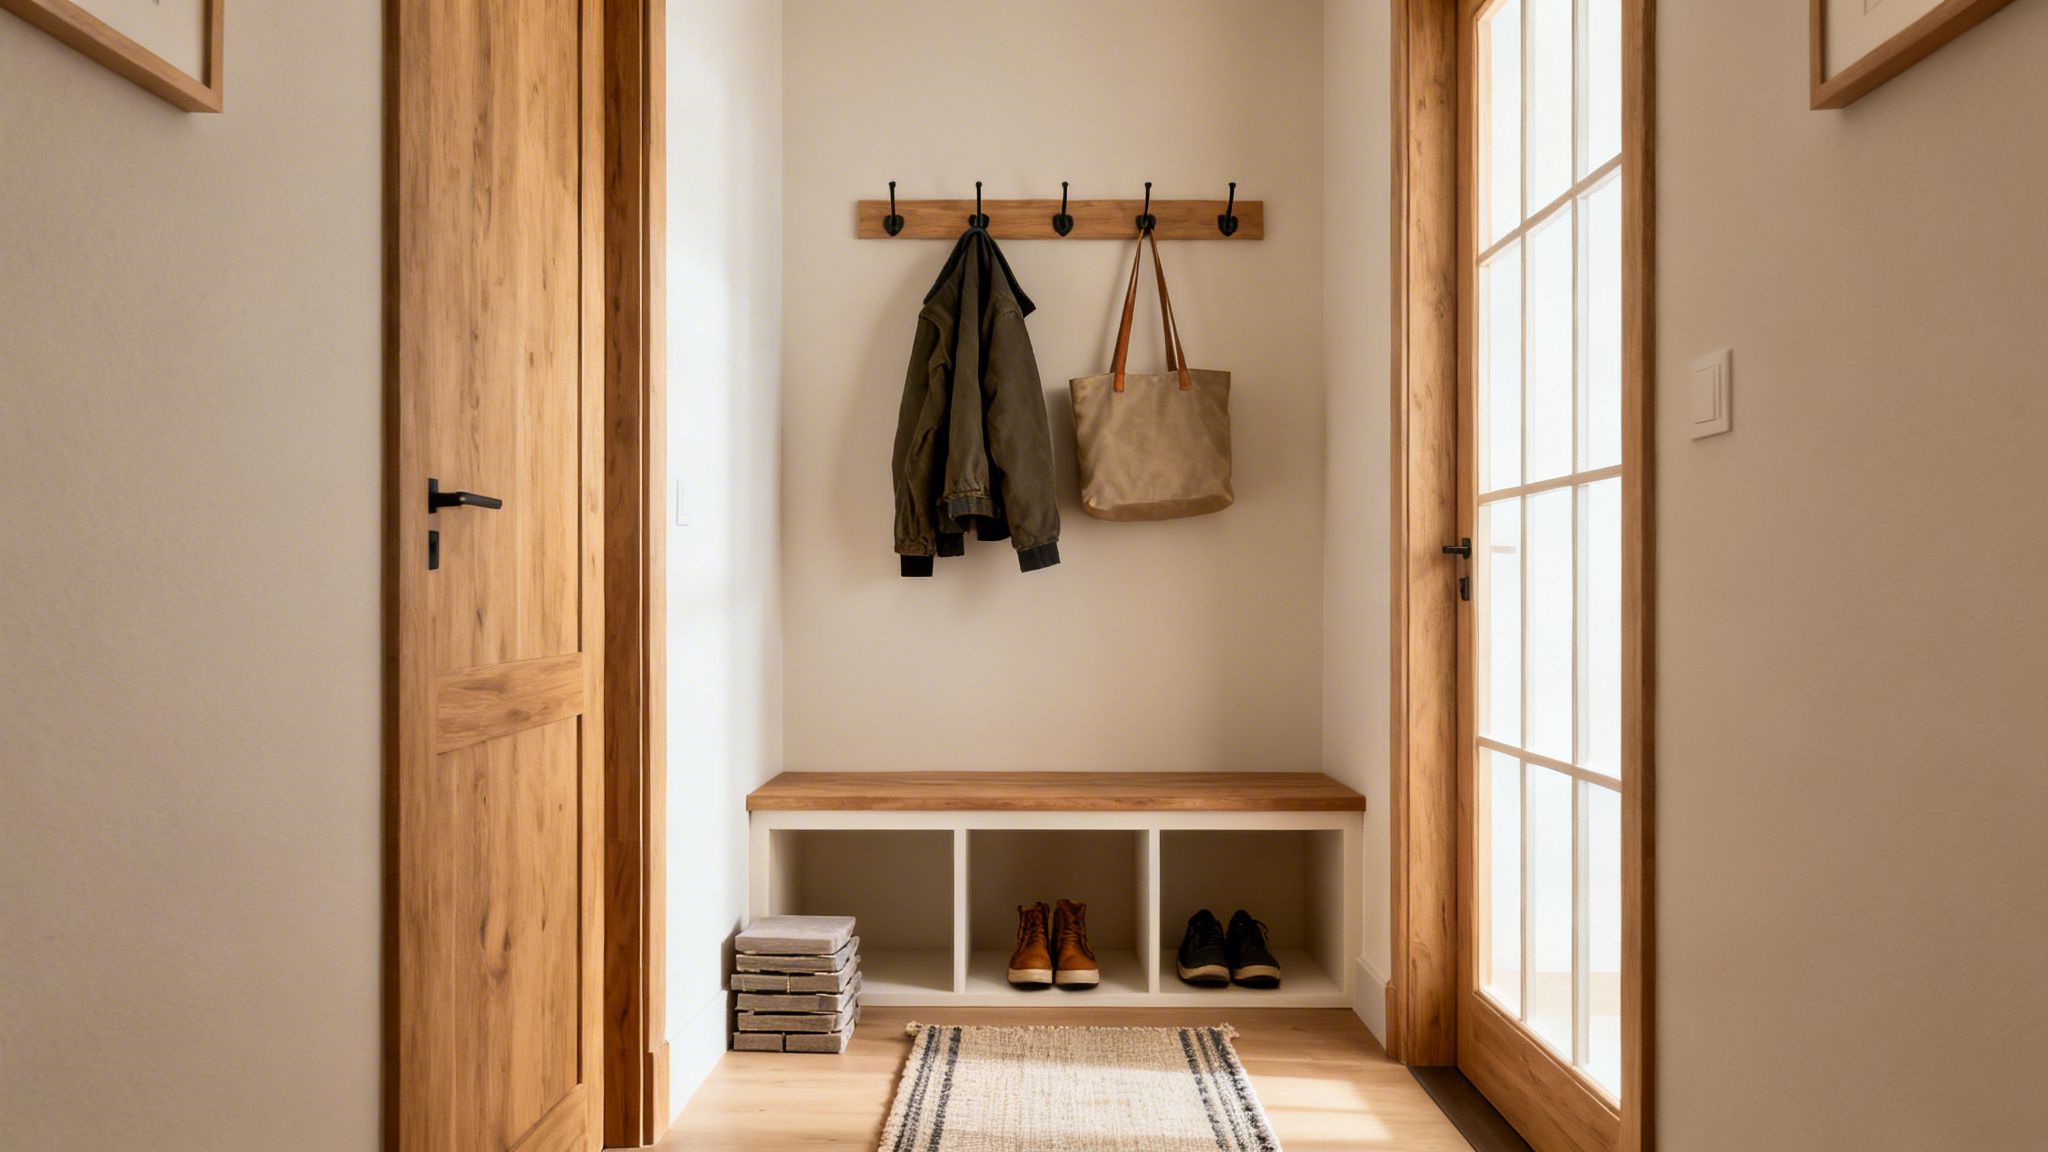
See how the mix of natural wood and practical storage creates a warm, welcoming vibe that's both stylish and functional? This guide will be your roadmap, walking you from the initial idea to a finished mudroom you’ll love. And while we're focused on interiors here, you can also explore how these same design principles apply to your home's exterior design.
Laying the Groundwork for Your Mudroom Conversion
Before you even think about picking up a hammer, let's talk strategy. A successful mudroom conversion is all in the planning. Nailing down the details upfront is your best insurance against those dreaded mid-project changes, budget overruns, and ending up with a space that just doesn’t work. Think of it as building the entire thing on paper first.
It all starts with picking the right spot. The best candidate is almost always a closet right by a main entryway—whether it's your front door, back door, or the one from the garage. This prime real estate ensures the mudroom actually gets used as that essential drop zone for coats, shoes, and backpacks.
Measure Twice, Cut Once
Once you've zeroed in on the perfect closet, it's time to get down to the nitty-gritty. Grab a tape measure and document everything: width, height, and depth. But don't stop there. Make a note of any quirks, like the exact location of light switches or electrical outlets. Finding an outlet tucked away in the back could be a game-changer, opening up possibilities for a built-in charging station or some slick integrated lighting.
While you're at it, consider the flow of the space. Does that closet door really need to be there? Often, removing it creates a much more open and accessible nook, making a small area feel way bigger and more connected to the entryway.
Getting Real About the Budget
One of the best things about a closet-to-mudroom project is how much money you save. A full-blown mudroom addition can easily set you back $3,600 to $10,800, but repurposing an existing closet brings that number way down. Professionals typically charge between $1,800 and $3,600 for these conversions. If you’re handy, you can often pull it off for under $500.
This kind of high-impact, low-cost upgrade is a huge reason the home renovation market hit USD 485 billion in 2024. People want big improvements without the huge price tag, and these projects deliver an impressive 83% return on investment.
To map out your own costs, start listing things out:
- Materials: What will you need for the build? Think lumber for the bench, beadboard for the walls, new flooring, and paint.
- Hardware: It’s the small things that count. Hooks, drawer pulls, and storage baskets can add up.
- Tools: Do you need to buy or rent anything specific, like a miter saw or a nail gun, to get the job done right?
- Contingency Fund: This is non-negotiable. Always add 10-15% to your total estimate. You’ll thank yourself when you hit an unexpected snag.
A clear budget isn't about restriction; it's about making smart decisions. It helps you focus your spending on what will actually make a difference for your family's day-to-day life.
Designing a Layout That Actually Works
With your measurements and budget locked in, the fun part begins: designing the layout. This is your chance to create a space that’s tailored specifically to how your family lives. Don't just pull a design from Pinterest—think about your daily routine. What are the biggest clutter culprits in your entryway? Design a solution for that.
Here are a few key elements to consider:
- A Place to Sit: A built-in bench is a mudroom classic. Aim for a depth of around 18 inches for comfortable seating.
- Shoe Solutions: Will open cubbies under the bench do the trick? Or would you rather hide the mess with pull-out trays or stylish baskets?
- Hooks for Everything: How many hooks do you really need? I often recommend a double row—a higher one for adults and a lower one that kids can actually reach for their own coats and backpacks.
- Go Vertical: Don't waste that space up top! A high shelf is perfect for stashing out-of-season gear like hats and gloves in decorative bins.
You can play around with different configurations using a tool like our AI interior design generator to see what works before you commit. A thoughtful plan is what turns a simple closet into a hardworking, beautiful space that makes life just a little bit easier.
Designing a Functional and Stylish Space
With the practical planning out of the way, we get to the fun part—designing a space that’s not just functional but also a beautiful extension of your home. This is where you’ll make the critical decisions on storage, materials, and lighting that will bring your new mudroom to life. The real goal here is to create a hardworking nook that feels intentional and inviting, not just like a repurposed closet.
Every choice you make at this stage, from the flooring under your boots to the hooks on the wall, contributes to the final result. Let's dive into the options that will help you build a stylish, durable, and incredibly organized mudroom.
Built-In Benches vs Freestanding Solutions
One of your first big decisions is how you'll handle the seating and primary storage. Are you going for a custom, permanent built-in, or do you prefer the flexibility of freestanding furniture? There's no wrong answer, but your choice will really depend on your budget, your DIY skills, and how permanent you want this conversion to be.
Built-In Benches: This is the gold standard for a true
convert closet to mudroomproject. A custom bench feels seamless and high-end because it’s integrated directly into the space. It lets you maximize every single inch of width and provides a rock-solid foundation for cubbies, drawers, or open shoe storage underneath. It's definitely more work, but the payoff is a purpose-built feature that adds real value to your home.Freestanding Units: If you're renting or just aren't ready to commit to a permanent change, a freestanding bench is a fantastic alternative. You get the mudroom vibe without major structural alterations. You can find slim benches that already have shoe shelves built in, or pair a simple bench with some stylish baskets for a look that's both versatile and budget-friendly. For a creative spin, I’ve seen people upcycle an old dresser into a charming bench with built-in drawer storage.
Choosing Durable and Stylish Materials
The materials you choose will define your mudroom's look and, more importantly, its longevity. This is a high-traffic zone that's going to see a lot of action—dirt, moisture, and daily wear and tear—so you need surfaces that can take a beating.
When it comes to the walls, you have a few great choices:
- Beadboard Paneling: This is a classic for a reason. It instantly adds a ton of character and charm. More practically, its semi-gloss finish is tough as nails and super easy to wipe clean, which is perfect for protecting the walls from scuffs and damp coats.
- Simple, High-Quality Paint: Never underestimate the power of a fresh coat of paint. Just make sure you choose a satin or semi-gloss finish in a durable, scrubbable formula made for busy areas. I often recommend using a rich, darker color on the back wall—it creates a cozy, inviting feel and does a brilliant job of hiding scuffs.
For flooring, Luxury Vinyl Plank (LVP) is a real winner. It's waterproof, scratch-resistant, and surprisingly easy to install, making it a dream for a DIY project. Alternatively, you can't go wrong with classic ceramic or porcelain tile. It offers unbeatable durability and is a breeze to clean, though the installation is a bit more involved.
Pro Tip: Function has to come first. It’s easy to get caught up in aesthetics, but a mudroom is meant to be used—hard. Always choose surfaces that can handle the daily chaos without looking worn out after a few months.
To help you decide, let's break down some common material choices.
Material Comparison for Your Mudroom Conversion
Choosing the right materials is a balancing act between durability, cost, and the look you're going for. This table compares some of the most popular options for a closet-to-mudroom conversion.
| Material | Best For | Average Cost (per sq ft) | Pros | Cons |
|---|---|---|---|---|
| Flooring: Luxury Vinyl Plank (LVP) | DIY-friendliness & waterproofing | $2 - $7 | Highly durable, 100% waterproof, easy click-lock installation. | Can be dented by heavy objects; less "premium" feel than tile. |
| Flooring: Ceramic/Porcelain Tile | Maximum durability & classic look | $2 - $15 | Extremely durable, waterproof, easy to clean, endless style options. | Colder underfoot, can be slippery, more difficult to install. |
| Walls: Beadboard Paneling | Charm & wall protection | $1.50 - $4 | Adds architectural interest, very durable, easy to wipe clean. | Can be tricky to cut around outlets; more expensive than paint. |
| Walls: Scrubbable Paint | Budget-friendly & easy customization | $0.50 - $1 | Inexpensive, infinite color choices, easy to apply and touch up. | Less durable than paneling; shows scuffs and dirt more easily. |
| Built-ins: Plywood | Sturdy & paintable custom builds | $2 - $5 | Strong, stable, provides a smooth surface for painting. | Requires careful finishing on edges to look professional. |
| Built-ins: MDF | Budget-friendly & smooth finish | $1.50 - $4 | Inexpensive, very smooth surface perfect for paint, easy to cut. | Heavy, not moisture-resistant unless specifically treated. |
Ultimately, the best materials for your project will be the ones that fit your budget, skill level, and daily needs. A family with three kids and a dog will probably want to prioritize tile and beadboard, while a single person in a condo might be perfectly happy with LVP and a good quality paint.
Maximizing Every Inch with Smart Storage
A mudroom lives or dies by its storage. The magic of this project is how a tiny closet can become an organizational workhorse if you think vertically and use every inch wisely. A standard 3–5 foot reach-in closet offers 6–10 sq ft of floor space, but with smart design, it can easily store 10–20 pairs of shoes, 4–6 bags, and 6–10 coats. This incredible efficiency is why the global closet organizers market is projected to hit USD 8,529.7 million by 2035, a trend detailed by the market analysts at Mordor Intelligence. People want to make their small spaces work harder.
Here are a few proven ideas to make that happen:
- Double Hooks: This is the easiest trick in the book. Install two rows of sturdy hooks—one up high for adult coats and bags, and a lower one for kids' backpacks and jackets. You've just doubled your hanging capacity.
- Upper Shelving: That space above the hooks is pure gold. A high shelf is the ideal spot for labeled baskets or bins where you can stash out-of-season gear like hats, scarves, and gloves.
- Cubbies and Baskets: Under-bench storage is non-negotiable for taming the shoe monster. Open cubbies are great for quick access, while pull-out baskets are perfect for hiding the clutter and keeping things looking tidy. You can find more inspiration for creating these kinds of defined zones in our guide to living room ideas that feel organized and cohesive.
Illuminating Your New Space
Don’t let lighting be an afterthought. The right light can completely transform a dark, cramped closet into a bright and welcoming entryway. Good lighting isn't just about finding your keys; it makes a small space feel significantly larger and more pleasant to be in.
You could install a single, stylish flush-mount fixture on the ceiling or a wall sconce for general ambient light. For a more modern and targeted approach, I love using low-profile, battery-operated LED puck lights or strip lighting. Tucked under the upper shelf, they cast a perfect glow on the bench and hooks below. If you have an outlet nearby, even a small decorative lamp placed on a shelf can add a warm, cozy touch that makes all the difference.
Your Hands-On Construction Guide
Alright, you've got your plan locked in. Now for the fun part: rolling up your sleeves and making it happen. This is where the sketches and ideas become a real, functional part of your home. We'll walk through the entire build process, breaking it down into manageable stages so you can focus on one thing at a time without feeling overwhelmed.
The journey starts with clearing the old space to make way for the new. From there, we'll get the walls prepped, lay down the new floor, build out the core components like your bench and cubbies, and finally, add all those finishing touches that really make it shine. Think of it as a logical sequence—each step builds right on the last.
This infographic breaks down the core phases of the build, helping you focus on storage, walls, and lighting in a sensible order.
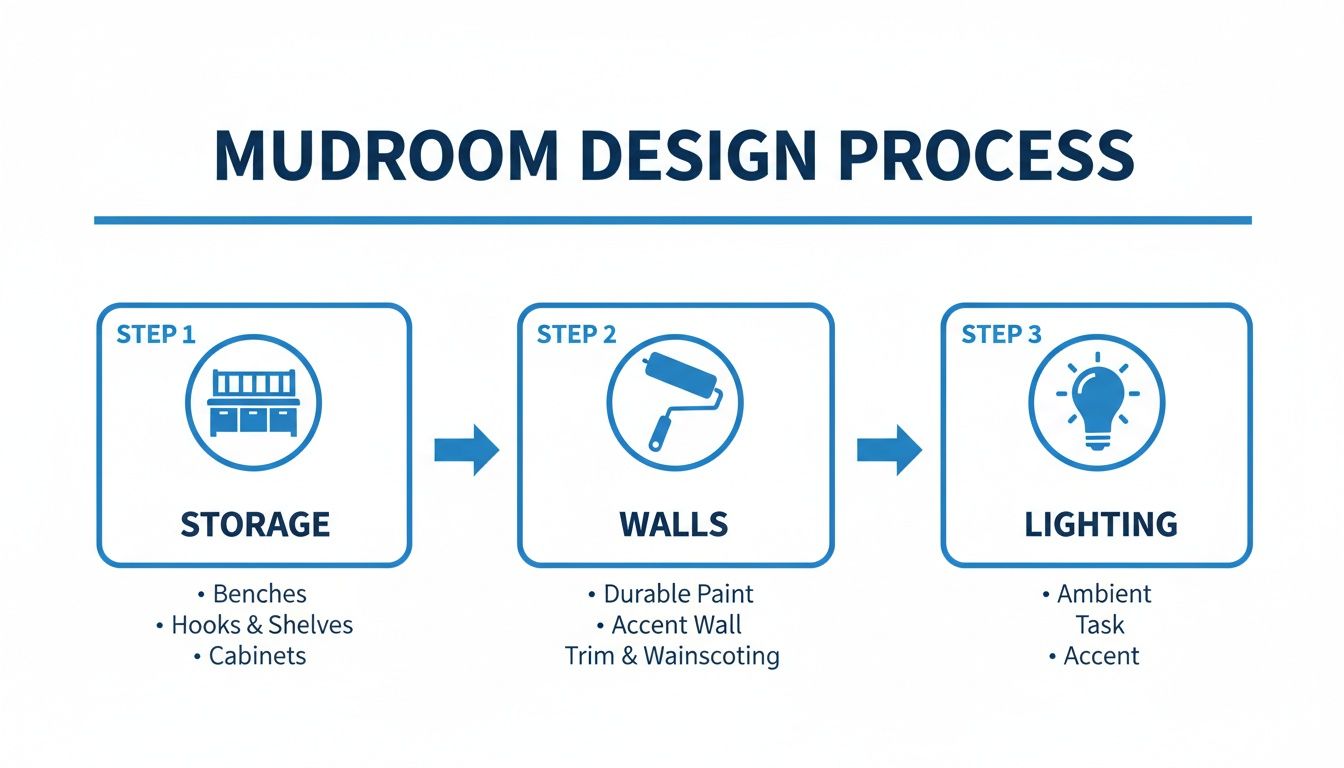
Tackling these key areas methodically is the secret to a smooth project. It keeps you from having to backtrack and redo your work, which is a huge frustration saver.
Preparation and Demolition
Every great renovation begins with a clean slate. The first real move is to empty the closet completely and start the demolition. Honestly, this part is often quicker and more satisfying than people think.
Here's what you'll be doing:
- Remove the Doors: Start by unscrewing the hinges and taking the closet doors down. If you have sliding doors, just lift them out of their tracks, then unscrew the tracks themselves.
- Tear Out Old Shelving: Go ahead and remove any existing shelves, brackets, and closet rods. Most are just held in with a few screws and come out without much of a fight.
- Pull Up the Flooring: If new flooring is part of the plan, now's the time to rip out the old carpet and pry off the baseboards. A good pry bar and a utility knife will be your best tools for this job.
As you tear things out, you'll almost certainly find some scuffs and holes in the drywall from old hardware. Don't worry about it—that’s completely normal and exactly what the next phase is for.
Wall Prep for a Professional Finish
With the closet cleared out, your attention turns to the walls. I can't stress this enough: this step is absolutely critical if you want a smooth, professional-looking result. Rushing through wall prep is a classic rookie mistake that can make even the most expensive paint look cheap and sloppy.
Take your time to patch every single hole left by screws and hardware. A little spackle or drywall compound on a putty knife does the trick. Let it dry completely, then sand it perfectly smooth so it’s flush with the wall. You might need a second coat for any deeper dings.
Once everything is patched and sanded, wipe the walls down with a damp cloth to get rid of every bit of dust. This is key for making sure your primer and paint actually stick. Then, apply a quality primer. It seals the patches and creates a uniform canvas, ensuring your final paint color looks even and true.
Don't skip the primer! It feels like an extra, tedious step, but it makes a world of difference in the quality of your paint job. It’s the secret to hiding old wall imperfections and getting a rich, even color.
Installing Flooring and Building Core Components
Walls prepped? Great. Now it's time to tackle the floor and start building the main event: the bench and storage units. If you're putting in new flooring like Luxury Vinyl Plank (LVP), this is the moment to do it—before the built-ins are installed. It just creates a much cleaner, more finished look.
Building the bench is truly the centerpiece of your convert closet to mudroom project. Whether you're working with sturdy plywood or smooth MDF, measure twice and cut once based on your design plans. For most DIYers, a simple box frame construction is the most straightforward and durable method.
After the bench frame is built and securely fastened to the wall studs for stability, you can add the vertical dividers for your cubbies. A pocket-hole jig is a game-changer here, allowing you to create incredibly strong joints that are completely hidden from view. If you want to play around with the final layout before you start cutting wood, our free AI interior design tool can help you visualize the finished space.
Electrical Work and Lighting
If your dream mudroom includes new lighting, this is the point where you need to be honest about your skill level. Adding a simple battery-operated puck light or some peel-and-stick LED strips is a perfectly safe and easy DIY task. Tucking them under a top shelf can cast a nice, warm glow on your bench area.
However, if your plans involve a hardwired sconce, a new ceiling fixture, or adding an outlet, I strongly recommend hiring a licensed electrician. Messing with your home's wiring is genuinely dangerous if you don't know exactly what you're doing. A pro can get the job done safely and up to code, usually in just an hour or two. It's money well spent.
The Finishing Touches That Matter
This final stage is all about the little details that pull the whole look together. It’s where your project goes from "under construction" to a finished, polished space. Don't get impatient and rush these last few steps—they truly separate a decent DIY job from a spectacular one.
Your finishing checklist should look something like this:
- Caulking: Run a thin, smooth bead of paintable caulk along all the seams—where the built-ins meet the walls, and where trim pieces join. This simple step magically hides any small gaps and makes everything look like a single, cohesive unit.
- Painting: Now it's time for the final coats of paint on the walls and the new built-ins. I always recommend a durable, easy-to-clean finish like semi-gloss or satin, since this is a high-traffic area that will definitely see some wear and tear.
- Installing Hardware: The last step is adding the hooks, drawer pulls, and any other hardware. Take your time to measure and mark their locations precisely so everything is level and evenly spaced. This is the "jewelry" of your mudroom, so pick pieces that you really love!
Once that last hook is screwed in, take a step back and enjoy what you’ve built. You've successfully turned an underused closet into a stylish, hardworking hub for your home.
Clever Solutions for Renters and Small Budgets
Don't have the green light—or the budget—for a full-blown renovation? That doesn’t mean a functional mudroom is out of reach. With some creative thinking, you can carve out a stylish and organized entryway without any major construction. The trick is to lean into versatile, non-permanent solutions that give you the most bang for your buck.
You can easily get that convert closet to mudroom feel with some well-chosen freestanding furniture. A slim bench, maybe one with a shoe rack underneath, immediately creates a place to sit down and kick off your shoes. I always advise people to look for narrow pieces specifically designed for entryways; they'll fit neatly within the closet's footprint without making the space feel tight.
Another great trick for renters is the humble tension rod. Just wedge one horizontally between the closet walls, and you’ve got an instant hanging rack. Add some S-hooks, and it’s perfect for bags, scarves, and lighter jackets. Best of all? No screws, no holes, no problem when it’s time to move out.
Damage-Free Decorating and Upcycling
To add a bit of personality without upsetting your landlord, peel-and-stick products are a game-changer. Removable wallpaper can instantly transform the back wall of the closet into a stunning focal point with a pop of color or a cool pattern. The same goes for flooring—peel-and-stick tiles can cover an old, tired surface with something durable and attractive that peels right off later.
If you own your home but are watching your wallet, upcycling is your best friend. I've seen clients turn an old, sturdy dresser into a fantastic bench with just a bit of paint. The magic happens when you remove the top drawers to create open cubbies for baskets, while the bottom drawers remain for handy, hidden shoe storage.
A beautiful, hard-working entryway doesn't have to cost a fortune. By zeroing in on smart, non-permanent solutions and affordable materials, you can create a space that banishes clutter and looks incredible for under $200.
Smart and Thrifty Material Choices
When you're building on a budget, your material choices make all the difference. Skip the expensive hardwood and consider painted MDF (Medium-Density Fiberboard) for a simple built-in bench or shelves. It’s incredibly affordable, a breeze to work with, and gives you a perfectly smooth finish for painting.
And never underestimate the power of good hardware. You can score beautiful hooks, knobs, and pulls for next to nothing at flea markets, antique shops, or online marketplaces. From experience, I can tell you these small details are what make an inexpensive build look surprisingly high-end. For more ideas on crafting clean, organized spaces, take a look at our guide on minimalist living room ideas.
Here are a few budget-friendly ideas you could tackle this weekend:
- DIY Floating Shelves: Grab some simple brackets and a painted pine board from the hardware store for some cheap and effective vertical storage.
- Fabric Bins: Instead of building custom cubbies, just use coordinating fabric bins. They're perfect for organizing shoes, hats, and gloves while adding a nice, soft texture to the space.
- Wall-Mounted Organizers: A simple rail system with hooks or even a magnetic strip can be a lifesaver for corralling keys, mail, and sunglasses, keeping all that small stuff from taking over the bench.
These approaches prove that a great design is really about clever problem-solving, not just a big budget.
Common Questions About Closet to Mudroom Conversions
As you get ready to start your project, you're bound to have a few questions. I've tackled countless conversions like this, and a handful of the same queries always come up. Let's walk through them so you can move forward with confidence.
How Much Value Does a Mudroom Conversion Add to a Home?
While you won't find a precise dollar figure for a small mudroom conversion, we know that closet renovations in general offer a fantastic 83% return on investment. But the real value here is less about a number and more about marketability.
A thoughtfully designed mudroom is a huge draw, especially for families. It solves the universal problem of entryway clutter and tells potential buyers that the home is well-organized. In a competitive market, a dedicated spot to drop bags and coats—even a small one—can absolutely be the detail that makes your home memorable.
What Is the Best Closet Size to Convert into a Mudroom?
You can work with almost any reach-in closet near an entry, but the sweet spot is a space that's at least 3 to 5 feet wide and 2 feet deep. This gives you enough room to build a functional bench (a standard bench is about 18 inches deep) without making the area feel cramped.
With a 3-foot-wide closet, you can easily fit a single bench with a few hooks above it—perfect for one or two people. If you're lucky enough to have a 5-foot closet, you have the real estate for a longer bench with built-in cubbies underneath. The trick, no matter the size, is to think vertically.
Your project's success isn't just about floor space; it’s about smart, vertical design. A well-organized 3-foot closet conversion can easily outperform a poorly planned 5-foot one by using every available inch from floor to ceiling.
Do I Need a Permit for This Project?
For a straightforward conversion, the answer is almost always no. If you’re just removing closet doors, painting, adding shelves, or laying down new flooring, you're dealing with cosmetic changes that don't typically require a permit.
However, things get more serious if you start making structural changes. Planning to move a wall? Adding a brand-new electrical circuit? That’s when you need to pause and check with your local building department. A quick call beforehand can save you from a world of headaches, potential fines, or problems down the road.
Can I Use AI Tools to Plan a Renter-Friendly Conversion?
Definitely. This is actually a perfect use case for AI visualization tools. You can take a photo of your closet, use an 'Empty Room' feature to get a clean slate, and start experimenting without touching a thing.
It's a great way to see how different freestanding benches or storage towers will actually fit in the space. You can even test out peel-and-stick wallpaper on the back wall to see if you like the look. This lets you finalize your entire design and get realistic previews before you spend a dime, ensuring everything works with your landlord's rules.
Ready to stop dreaming and start designing? RoomStudioAI can help you visualize your perfect closet conversion in seconds. Upload a photo of your space, and our AI will generate stunning, realistic redesigns, helping you choose the perfect layout, colors, and furniture before you begin your project.
Ready to redesign your space?
Try our AI interior design tool and see your room transformed in seconds.
Try Free Design

