A paint color visualizer is essentially a digital tool that lets you see what different paint colors will look like on your walls before you even think about picking up a brush. Think of it as a virtual try-on for your home, giving you the freedom to experiment with countless shades and combinations using a photo of your own room.
Why a Paint Color Visualizer Is Your Most Important Tool
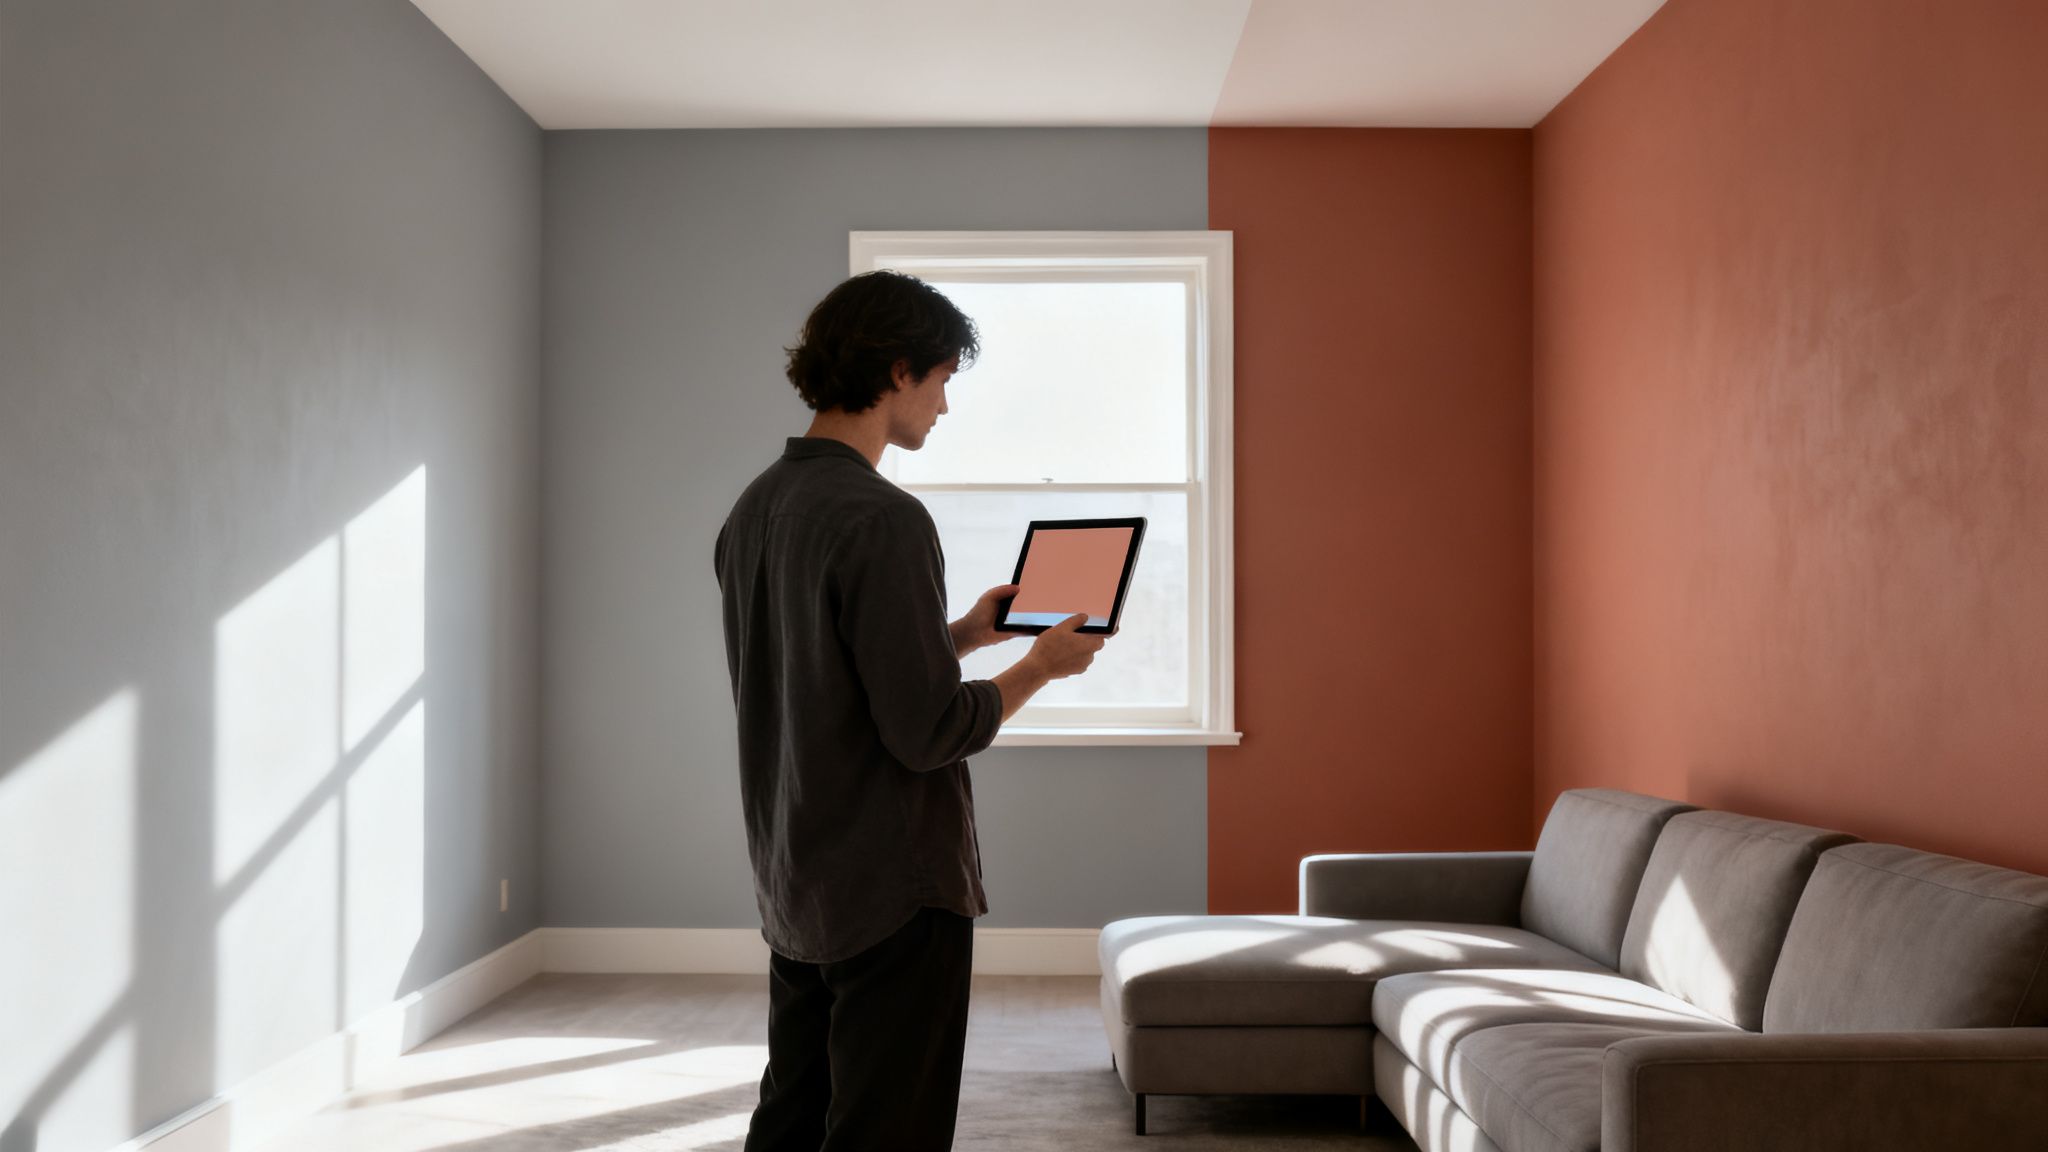
Choosing a new paint color can be surprisingly nerve-wracking. Anyone who's ever stood in a room, holding a tiny two-inch paint chip against a massive wall, knows that feeling of deep uncertainty. You're trying to imagine how that little square will look when it's a hundred times bigger.
What looks perfect on a small swatch can feel completely overwhelming or just plain wrong once it's actually on the wall. This often leads to the dreaded do-over—a costly and frustrating repainting job nobody wants.
This is exactly the problem a paint color visualizer was built to solve. It closes the gap between your imagination and the real-world result, offering a reliable preview that takes expensive guesswork out of the equation.
Boost Your Confidence and Protect Your Budget
The biggest win here is the confidence you gain before committing. Instead of just hoping a color works with your couch or your floors, you can see a realistic simulation of the final look. This digital-first approach brings some serious advantages to the table.
- Sidestep Expensive Mistakes: You can quickly spot colors that clash with your lighting, furniture, or flooring without wasting a dime on paint or labor.
- Save a Ton of Time: It helps you narrow down your choices fast, so you only need to buy physical samples for your top two or three contenders.
- Cut Down on Waste: Getting the color right the first time means no more half-used cans of "oops" paint cluttering up your garage.
This technology has quickly become a go-to tool for homeowners and professional designers alike. The global market for these apps recently shot up to USD 1.18 billion, and a big reason is that they help prevent the color regret responsible for up to 40% of all repaint jobs. With projections showing the market growing toward USD 3.85 billion by 2033, it's clear more and more people are discovering this smarter way to choose paint.
If you're looking to do more than just change your wall color, you might want to check out our free AI interior design tool to reimagine your entire space.
Exploring the Different Types of Paint Visualizer Tools
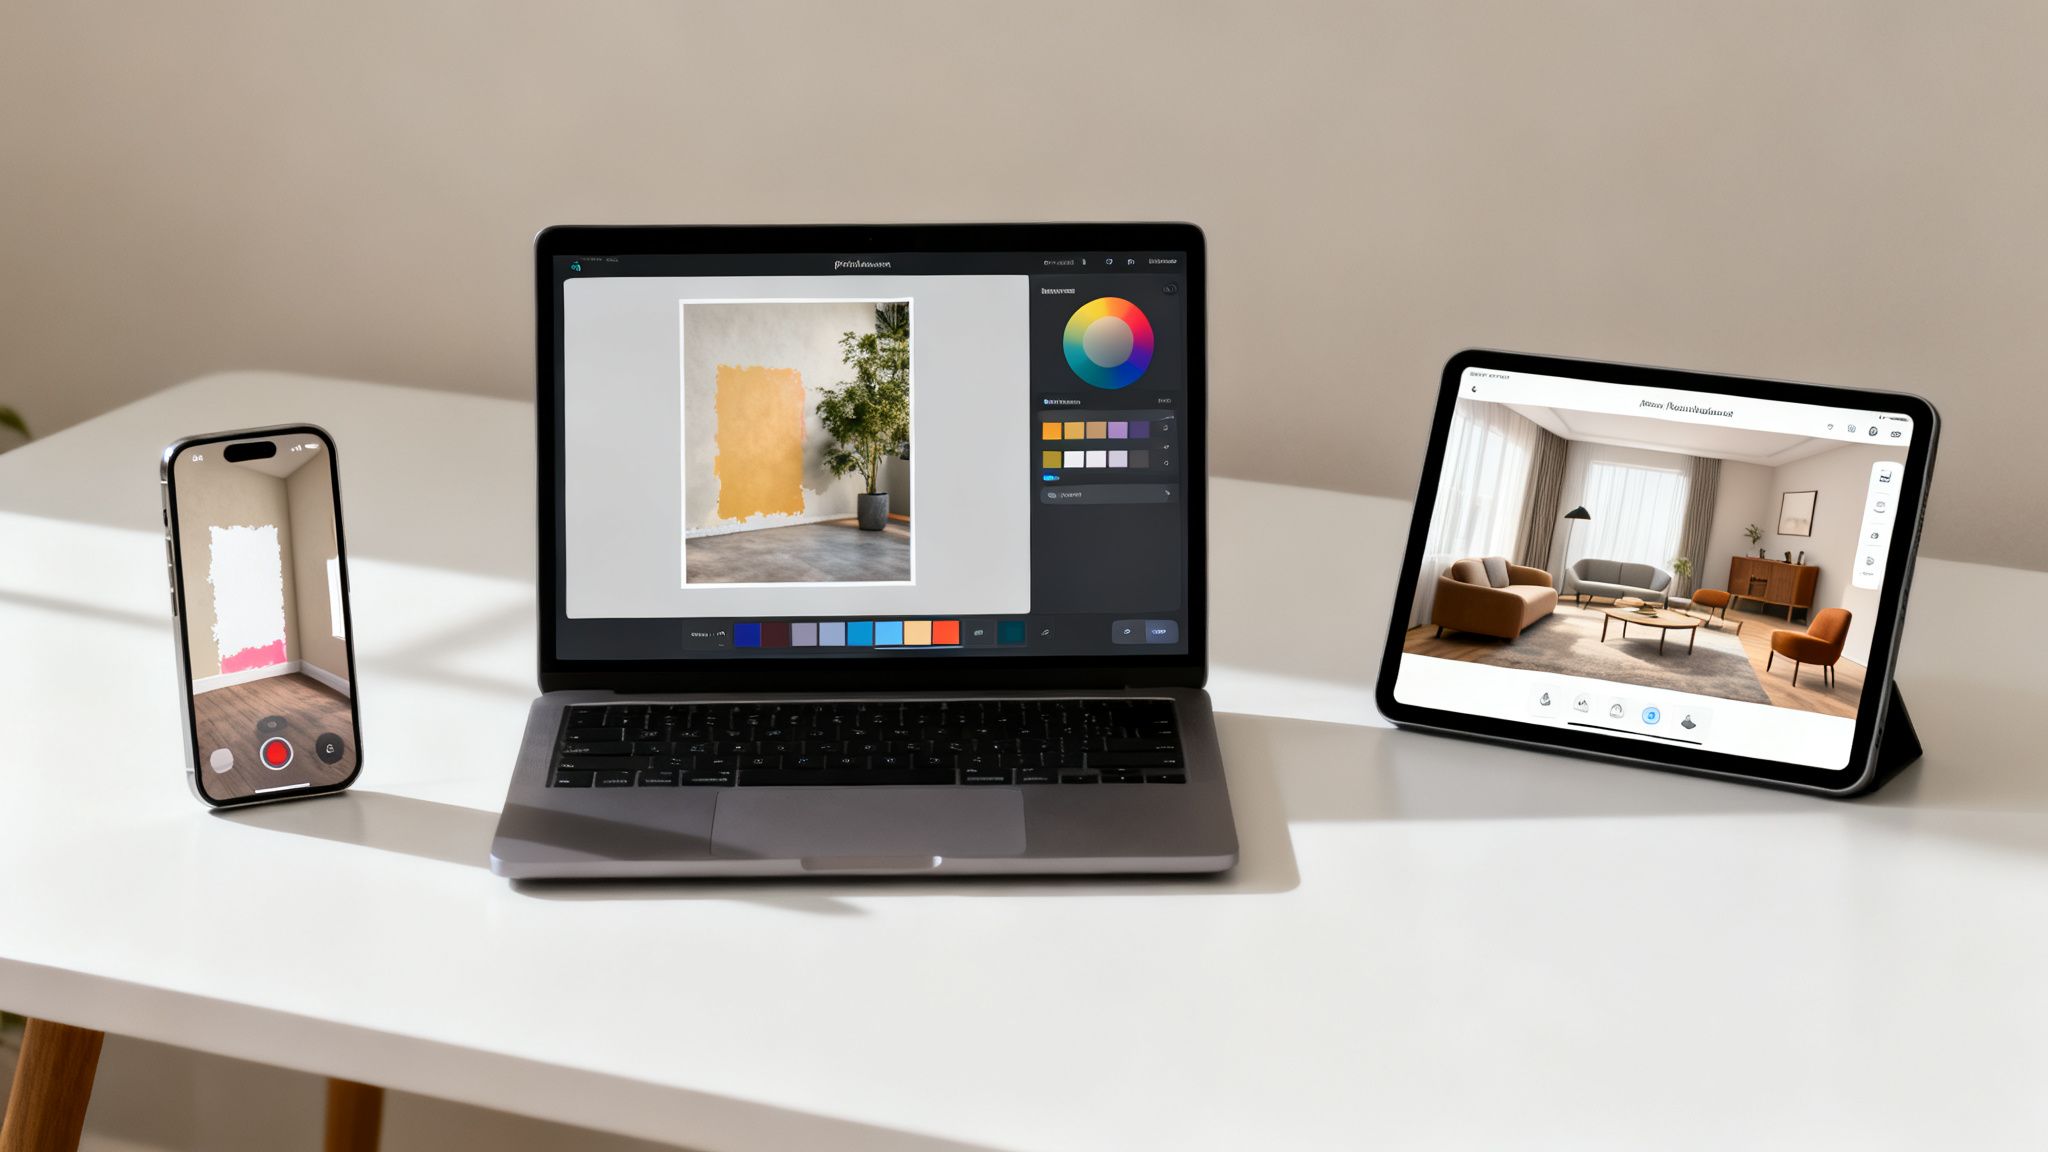
Not all paint visualizers are created equal. The technology behind them can be as simple as a basic photo editor or as complex as a full-blown design platform, and each one offers a different experience. Knowing the difference is crucial for picking the right tool for your project.
Think of it like a journey. You can start with the most basic tools to get your bearings, then move on to more interactive and powerful options that give you a much deeper understanding of how a color will really behave in your space. Let’s break down the three main types you’ll come across.
Photo-Based Visualizers
The most common entry point into the world of paint visualizer tools is the photo-based visualizer. It's straightforward: you snap a picture of your room, upload it, and then use a digital brush or a "paint bucket" tool to splash different colors onto the walls of your static image.
This approach is perfect for getting a quick first impression of a color. It’s incredibly accessible—all you need is your phone—and it helps narrow down your initial choices.
- Pros: Super easy to use, great for initial brainstorming, and offered by just about every major paint brand out there.
- Cons: The final preview is only as good as the photo you upload. Bad lighting or heavy shadows in your picture can seriously throw off how the color looks.
Augmented Reality (AR) Visualizers
AR visualizers are where things get more interesting. These tools use your phone's camera to superimpose paint colors onto your walls in real time. As you walk around the room, the color maps itself onto the surfaces, giving you a live, dynamic preview.
This method gives you a much better feel for how a color will actually live in your space. You can see how it wraps around corners and reacts to the light shifting as you move.
Using an AR visualizer is like getting an instant, commitment-free paint job. You can immediately see how that bold color you've been eyeing plays with your sofa and art from every possible angle.
AI-Powered Design Platforms
The latest evolution in this space goes way beyond just swapping out wall colors. AI-powered platforms, like the tools offered at RoomStudioAI, are much smarter. They don’t just see a wall; they analyze the entire room—the layout, the light sources, and even the architectural details.
Instead of just showing you a new color, these advanced tools can recommend furniture, decor, and even different materials that would complement your choice. They basically act as a digital interior design partner, helping you turn a simple color decision into a complete, cohesive design concept. This makes them an incredible asset for bigger renovations or for anyone who wants that professionally designed look.
Ever wondered how a paint color visualizer creates a preview that looks so real? It’s easy to think it's just a simple color filter slapped onto your photo, like an effect on Instagram. But the technology at work is much smarter than that.
Think of it less like a filter and more like a digital artist who meticulously studies your room before "repainting" it.
To get a realistic result, the software first has to understand the space itself. It doesn't just see a flat picture; it maps out the different surfaces, figures out where walls meet the ceiling, and identifies the unique architectural details of your room. This groundwork is what makes sure the color goes on right.
Decoding Your Room’s Environment
The real magic kicks in when the visualizer accounts for the physics of light. Your room isn't lit evenly, right? Sunlight might pour through a window, a lamp could cast a warm glow in a corner, and shadows naturally pool behind furniture. A good visualizer sees all of this.
- Lighting and Shadow Detection: The software scans your photo for light sources and analyzes the existing shadows. It then calculates how a new wall color would behave under those exact same conditions, keeping the natural highlights and lowlights intact.
- Perspective Mapping: This is what helps the color wrap convincingly around corners and settle into alcoves. The tool essentially builds a simple 3D model from your 2D photo, which keeps the new paint from looking flat or stretched out.
This process is critical. After all, the same shade of greige can look wildly different in direct sunlight versus a dimly lit corner. For more on using these tools to get professional results, check out our guide on AI for interior design projects.
Translating Digital Color to Real-World Paint
Once the visualizer understands your room’s shape and lighting, it moves on to the hardest part: getting the color right. A color on your screen (an RGB value) isn't the same as a can of physical paint. This is where advanced visualizers use sophisticated color rendering algorithms to bridge that gap.
These algorithms are built to simulate how a specific paint formula—with its own unique pigments and finish, like matte or satin—will actually reflect light in the real world. This is why a preview from a high-quality tool feels so much more authentic than just tweaking the hue in a basic photo editor.
These calculations even factor in the original wall color and texture, giving you a preview that’s both context-aware and scientifically grounded. It’s this complex process that separates a fun gimmick from a truly useful design tool. By digitally recreating how light, shadow, and color chemistry all work together, a paint color visualizer gives you a surprisingly reliable peek into your future room.
A Step-By-Step Guide to Getting Accurate Results
Using a paint visualizer is exciting, but the final preview is only as good as the prep work you put in. Just like a real paint job, a little effort upfront makes all the difference. Following a few best practices will ensure the color you see on screen is a true-to-life representation of what you'll get on your walls.
Think of it like setting the stage for a performance. You need the right lighting and a clean, clear space for the color to really sing. A few simple adjustments can be the difference between a misleading preview and one you can actually trust.
This isn't complicated, but skipping these steps is a common reason people get inaccurate results and end up disappointed. Let's walk through exactly what you need to do to get a reliable visualization, no matter which tool you're using.
Prepare Your Room and Your Camera
First things first: you need a clean canvas. A cluttered room full of furniture, decor, and random shadows will only confuse the software and prevent it from mapping the color correctly.
- Declutter the Space: Pull furniture, artwork, and anything else you can away from the wall you plan to photograph. The more clear wall space the visualizer can "see," the better it can apply the new paint color.
- Get the Lighting Right: Natural daylight is your best friend here. Open the curtains and blinds to let in as much indirect sunlight as you can. You'll want to avoid taking photos at night under harsh artificial light, which will completely throw off the colors. Also, turn off any lamps that cast a strong yellow or blue hue.
- Clean Your Camera Lens: It sounds almost too simple, but it's so often overlooked. A quick wipe with a soft cloth gets rid of smudges and dust that can make your photo blurry and dull the colors.
Take the Perfect Photo
The photo you upload is the very foundation of your digital paint job. A low-quality photo will always produce a low-quality preview. Your goal is a shot that represents your room honestly.
- Stand Back: Find a spot in the center of the room and position yourself far enough back to capture the main wall straight-on. Avoid shooting from weird, sharp angles, as that will distort the whole perspective.
- Keep it Steady: A steady hand prevents motion blur. If you have trouble keeping still, try resting your arms on a table or the back of a chair.
- Focus on the Wall: Tap your phone's screen to focus directly on the wall you're about to paint. This makes sure the details and texture are sharp, which helps the paint color visualizer create a much more realistic finish.
A great photo for a visualizer captures the room honestly. It should reflect how the space looks and feels on a normal day, with balanced, natural light and a clear view of the walls you want to transform.
Calibrate and Compare Before Committing
Once your photo is uploaded, the fun part begins. But before you get lost in color options, remember that your screen's brightness and settings can affect how you perceive the shades.
If you want to take things a step further, you can explore how AI can help you reimagine your entire living room design concept, going way beyond just the paint.
Finally, and this is the most important step of all, always cross-reference with physical samples. A digital preview is an incredible tool for narrowing a hundred choices down to your top two or three. But before you buy gallons of paint, you absolutely must get physical swatch cards or a few sample pots. Paint a small test patch on your actual wall and watch how it looks as the light changes throughout the day. This final check is what truly bridges the gap between the digital preview and your real-world home.
Common Mistakes When Using Visualizers and How to Avoid Them
Even the best paint color visualizer can fall flat if you overlook a few key details. While these tools are incredibly helpful, they aren't magic—they rely on good input to create a preview that’s actually useful. Knowing the common pitfalls is the first step to making sure you don't fall into them.
The single biggest mistake? Feeding the tool a bad photo. A blurry, dark, or oddly angled shot forces the software to make wild guesses about where one surface ends and another begins. This leads to a messy, splotchy preview that doesn't look anything like real paint. The old saying "garbage in, garbage out" has never been more true.
Another classic error is ignoring the room's lighting. If you snap a picture at night under the warm, yellow glow of a lamp, even the brightest, crispest white will look muddy and off-color in the visualizer. The tool can only interpret the light it sees in your photo.
Forgetting the Digital-to-Physical Gap
Perhaps the most crucial misunderstanding is treating a digital preview as a 100% perfect final representation. It’s just not. Your computer screen creates color by emitting light (an RGB model), while physical paint reflects light using pigments. They are two fundamentally different ways of producing color, so some variation is guaranteed.
Your screen’s calibration, its brightness setting, and even the light in the room where you’re viewing the preview can all change how a color looks on-screen. Trusting it completely is a recipe for that sinking "that's not what I picked" feeling once the paint is on the wall.
This simple workflow shows the key stages for getting a preview you can actually trust, from initial prep to your final choice.
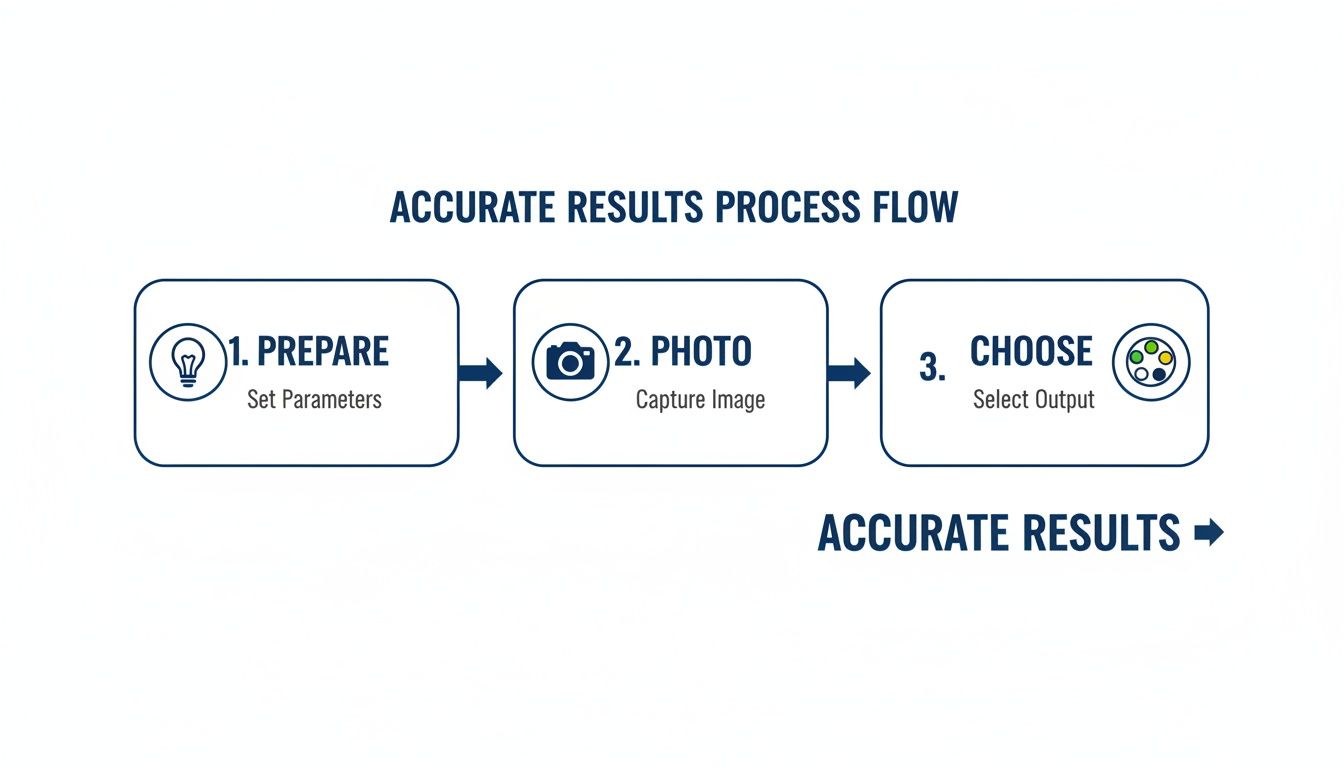
As the diagram makes clear, a great result isn't just about the tool itself. It's about the thoughtful steps you take before you even start clicking.
Quick Fixes for Common Visualizer Problems
The good news is that these common slip-ups are surprisingly easy to fix with a little preparation. Your goal is simply to give the visualizer the best, most accurate information to work with.
- Poor Lighting Fix: Always take your photo during the day. You want bright, indirect natural light flooding the space. Make sure to turn off all your lamps and overhead lights to avoid weird color casts.
- Low-Quality Photo Fix: Take a step back and get a clear, straight-on shot of the main wall you want to paint. Hold your phone steady, wipe the lens, and make sure the image is sharp.
- Screen Inaccuracy Fix: Use the visualizer to explore and get your choices down to a "shortlist" of two or three favorites. Then—and this is non-negotiable—always buy physical paint samples. It's the only way to see how a color truly looks and feels in your home's unique light throughout the day.
By sidestepping these simple mistakes, you can use a visualizer for what it does best: helping you confidently narrow down your options before you commit. It’s the bridge that connects your digital inspiration to a real-world space you’ll love. For more ideas on how the right wall color can anchor a room, check out this guide for a complete bedroom design makeover.
The Modern Design Workflow Using AI
While a standard paint color visualizer is a fantastic starting point for testing a single color, its job usually ends there. You're left holding a virtual paint chip, still needing to figure out the rest of the room. This is where newer AI platforms like RoomStudioAI step in, turning a simple color preview into a full-blown design partner. They answer the bigger, more important question.
Instead of just asking, "How does this color look on my wall?" this modern workflow asks, "How does this color live in a fully furnished, beautifully designed space?" It's a massive leap from just testing a color to actually creating a room.
From Paint Chip to Complete Design
The first step feels familiar: you upload a photo of your space. But what happens next is completely different. Rather than just letting you digitally slap some paint on the walls, an AI-powered tool first studies your room’s architecture, its windows, and even the way the light falls. This initial analysis is crucial for making sure everything that follows—from paint to new furniture—looks believable and fits correctly.
Once you pick a wall color, the AI doesn't just apply it. It reimagines the entire room to go with it. Your original layout is preserved, but the AI builds a complete design scheme right around your new color choice.
- Style Suggestions: It can instantly generate concepts in styles that work with your color, whether you’re leaning toward Modern, Coastal, or Japandi.
- Architectural Integrity: The AI respects your home’s character. It works with your existing fireplace, built-in shelves, and ceiling height, so the final design looks like it was made for your space, not just dropped into it.
- Realistic Lighting: The final renders are shown under your room's actual lighting conditions, giving you a true sense of how materials and colors will look with your specific natural and artificial light.
Bridging the Gap Between Vision and Reality
This all-in-one approach tackles one of the toughest parts of interior design: turning an idea for a color into a real, shoppable room. After all, a pretty picture is great, but it’s not much help if you can't make it happen. The whole point is to create an actionable plan.
This new workflow turns inspiration into a concrete plan. You go from a simple color swatch to a fully furnished, photorealistic render, and then directly to the products needed to make it happen.
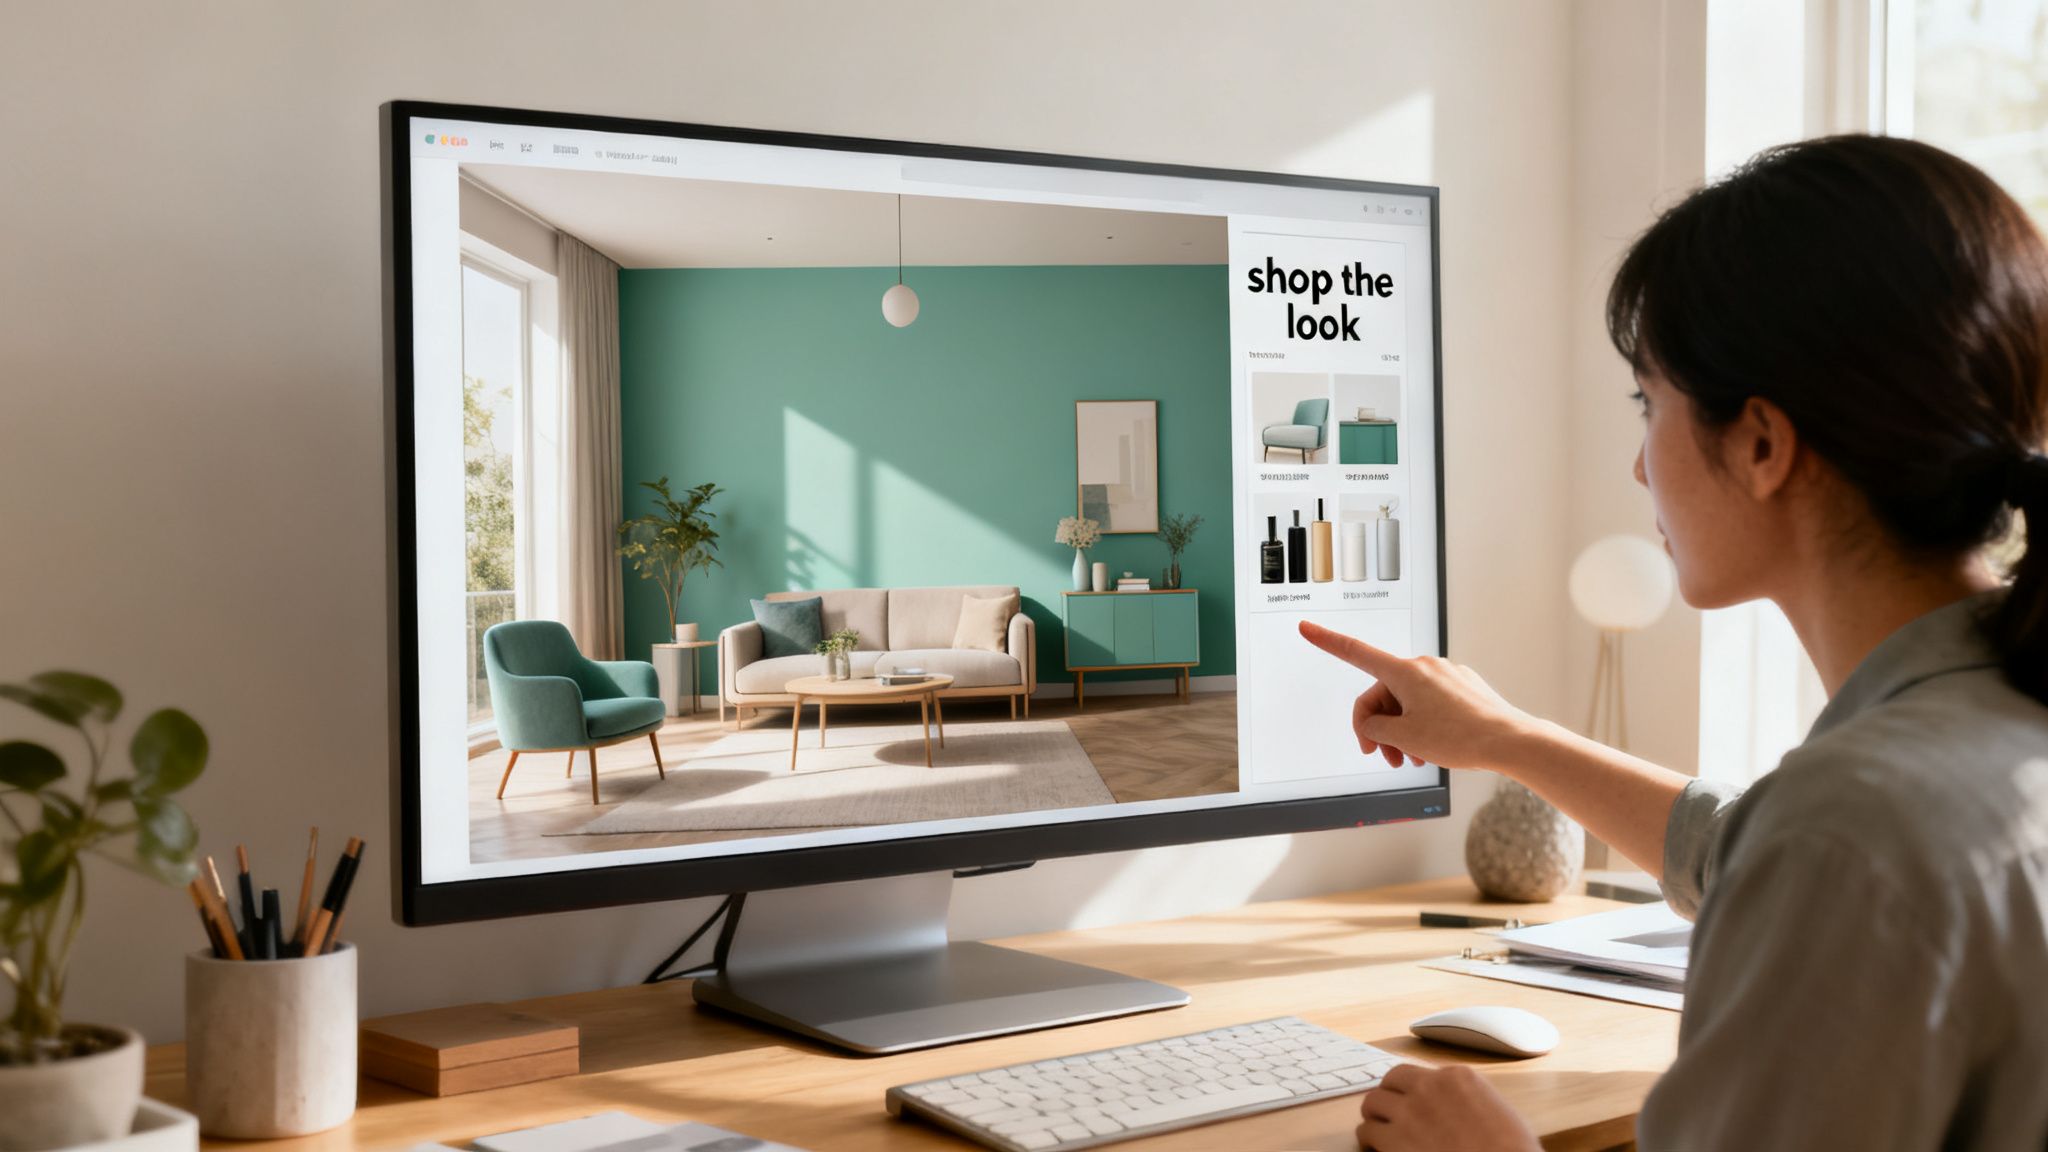
Top-tier platforms like RoomStudioAI now include a "shop the look" feature. This is the final piece of the puzzle. Using visual search, it identifies the furniture and decor in the design it created and then finds similar items you can actually buy from online stores. In a single click, you can find a couch, a lamp, or a rug that matches the vibe, closing the loop from digital mock-up to real-life purchase.
This completely redefines the paint color visualizer, evolving it from a simple testing tool into the first step of a smooth, complete redesign experience.
A Few Final Questions About Paint Visualizers
Let’s wrap things up by tackling some of the questions that almost always come up when people start exploring these tools. Think of this as a quick-start guide to clear up any lingering doubts before you dive into your next project.
How Accurate Are Paint Color Visualizers Anyway?
This is the big one. The short answer is they're incredibly accurate for getting a feel for a color's mood and presence in your room, but they can't replace a physical paint swatch. The final result always hinges on the quality of your photo, the lighting in your space, and even your monitor's color settings.
A paint visualizer is your best first step. It’s the perfect tool for narrowing an overwhelming sea of choices down to a handful of serious contenders before you commit to buying sample pots.
Can I Use a Paint Visualizer for My Home's Exterior?
Absolutely. Most modern visualizers are built to handle exteriors just as well as interiors. The process is the same: start with a good, clear photo of your home. For best results, take the picture on a day with even, overcast light to avoid the misleading effects of harsh shadows or direct sun.
Do I Need Any Special Software to Use One?
Nope, not at all. The best part about these tools is their simplicity. The vast majority of paint visualizers are web-based—you just visit the brand's website—or available as a simple mobile app. You can get started right away by uploading a photo or using your phone’s camera, no design degree required.
Ready to see beyond just a new wall color? What if you could see your entire space professionally redesigned in a matter of seconds? RoomStudioAI uses advanced AI to generate stunning, photorealistic designs that account for your room’s specific layout and lighting, even suggesting shoppable furniture to complete the look. Start designing for free today.
Ready to redesign your space?
Try our AI interior design tool and see your room transformed in seconds.
Try Free Design

