Stepping into the world of interior design can feel both exciting and overwhelming. With endless inspiration available, it is easy to get lost before you even begin. The good news is that creating a beautiful, functional, and personal space does not require a professional degree, just a solid understanding of a few core principles. This comprehensive guide breaks down ten foundational interior design tips for beginners, offering a clear and actionable roadmap to transform any room with confidence.
We will move beyond generic advice to provide practical steps you can implement immediately. You will learn how to master color palettes, arrange furniture for optimal flow and conversation, and use lighting to define both mood and function. We will also explore how to choose appropriately scaled furniture, create compelling focal points, and layer textures to add depth and sophistication.
Furthermore, we will demonstrate how to leverage powerful visualization tools like RoomStudioAI to test your ideas risk-free, seeing your concepts come to life before making a single purchase. By the end of this article, you will have a structured approach to decorating that eliminates guesswork. You will be equipped with the knowledge to make deliberate, impactful choices that turn your design aspirations into a stunning reality.
1. Start with a Color Palette
Establishing a cohesive color palette is the foundational first step in any successful interior design project. Rather than choosing colors randomly, a deliberate scheme creates visual harmony and prevents a space from feeling disjointed or chaotic. One of the most effective interior design tips for beginners is to adopt a simple rule: select two to three main colors for the larger elements like walls and sofas, and one to two accent colors for smaller items like pillows, art, and decor.
 or a Modern Minimalist scheme (gray, white, black) transforms your actual space before making any purchases.
- Test Paint Swatches: Always test paint colors on large swatches on multiple walls. Observe how they look throughout the day as natural light changes.
- Gather Physical Samples: Collect fabric swatches, wood samples, and metal finishes to see how the textures and colors interact in person.
2. Declutter and Arrange Furniture for Better Flow
Effective space planning is more than just buying new furniture; it’s about arranging what you have to create logical traffic patterns and functional zones. A cluttered room feels smaller and more chaotic, while a well-organized space appears larger and more intentional. One of the most impactful interior design tips for beginners is to first remove unnecessary items and then strategically place furniture to optimize movement and usability. This simple act of decluttering and rearranging can completely transform the feel of a room without spending a dime.
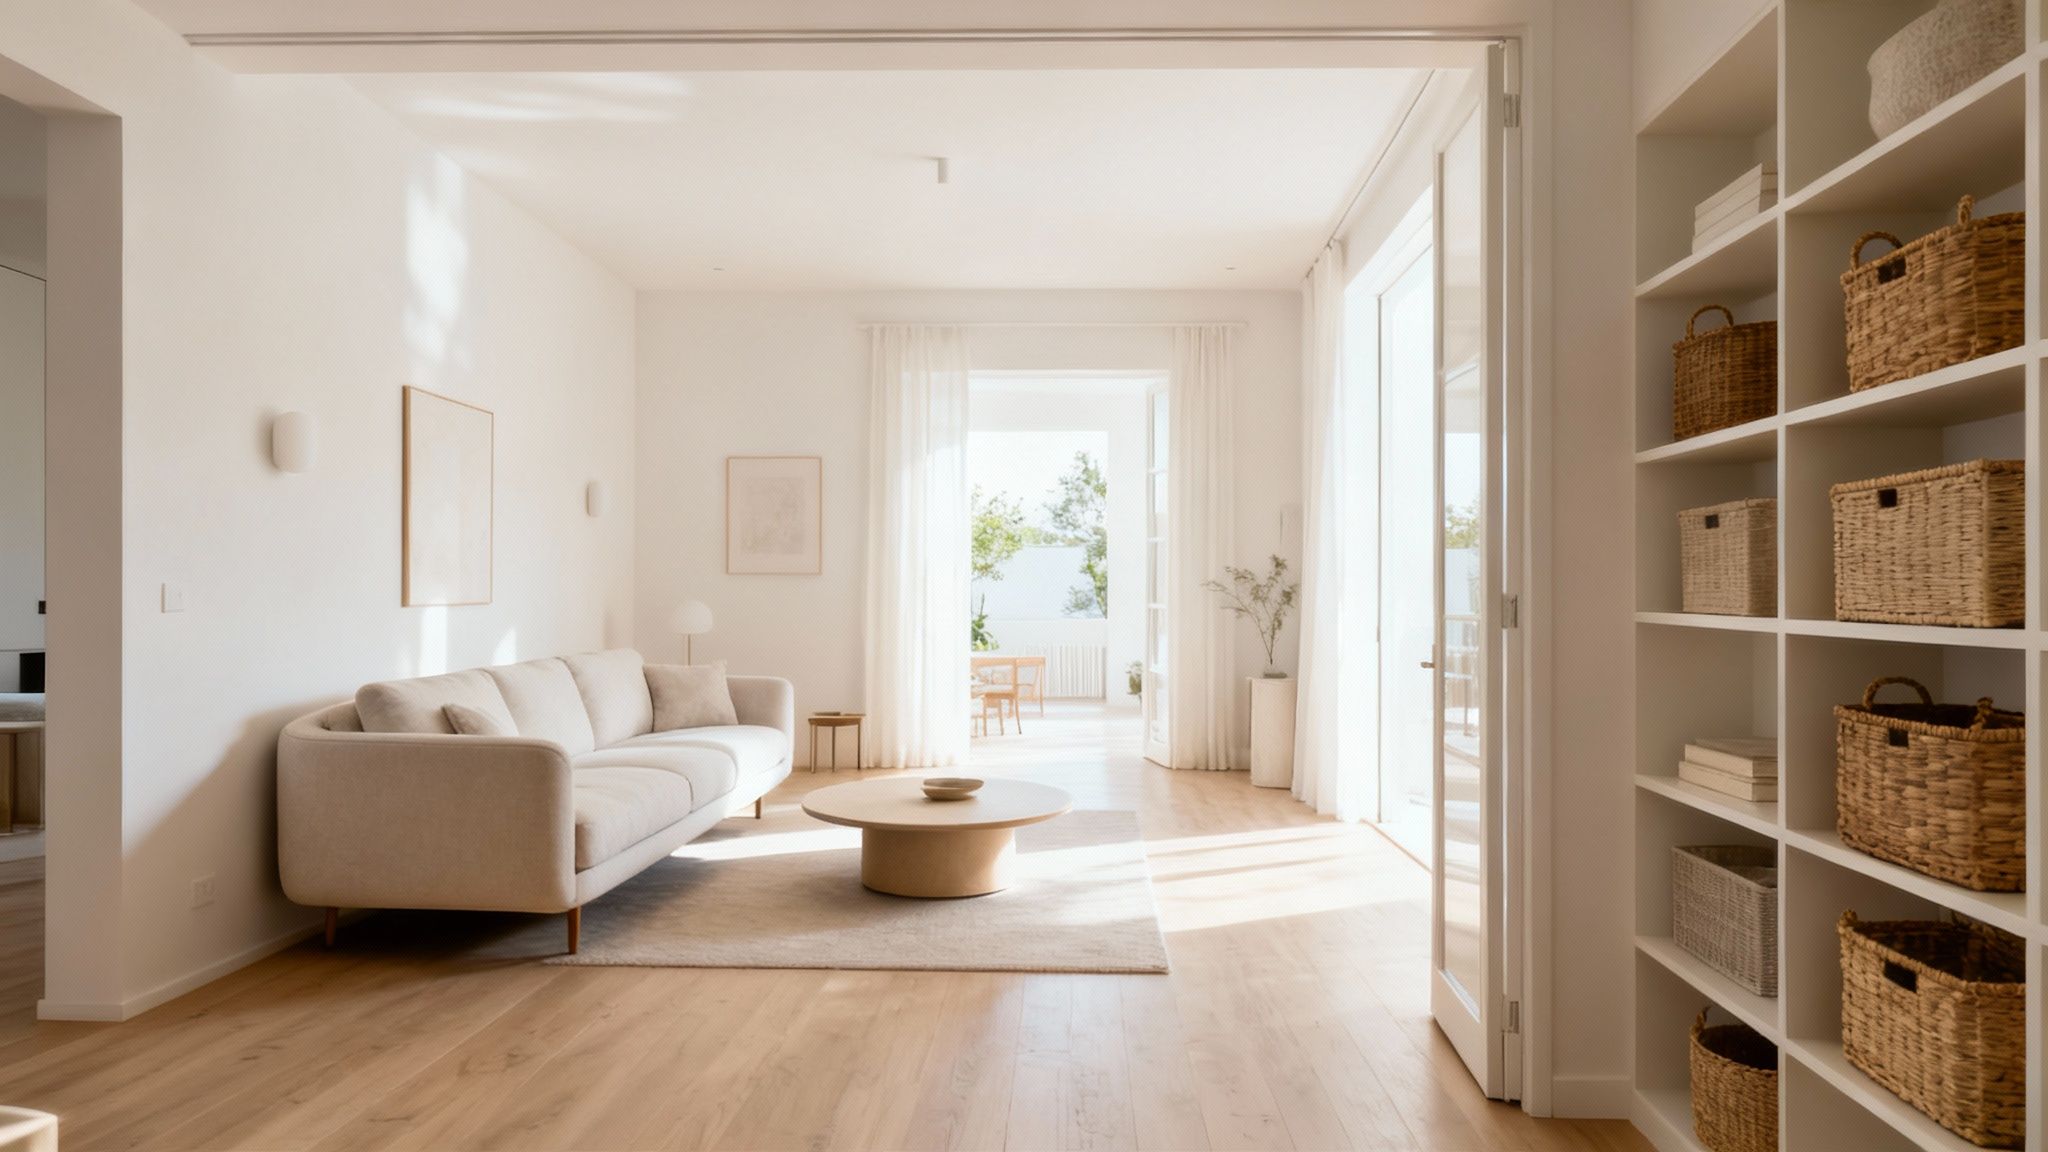
This approach is fundamental to creating a breathable, inviting atmosphere. By clearing surfaces and creating unobstructed pathways, you allow both light and people to move more freely. This concept is central to many design styles, particularly those highlighted in minimalist living room ideas, where every piece serves a purpose and contributes to a serene environment.
How to Implement Better Flow
Start by taking everything off surfaces and out of the immediate area. Then, arrange your largest furniture pieces first, like the sofa or bed, ensuring they don't block major walkways. Create dedicated zones by grouping furniture, for instance, by placing two chairs and a small table together to form a conversation nook.
Test Before You Move
Rearranging heavy furniture is physically demanding. You can save time and effort by planning your new layout virtually.
- Visualize Virtually: Use RoomStudioAI's "Empty Room" feature on a photo of your space. This gives you a blank canvas to experiment with different furniture arrangements and see how they impact the room’s flow before you lift a single item.
- Define Pathways: Aim to leave at least two to three feet of walking space in main traffic areas. This ensures the room is comfortable to navigate.
- Prevent Re-Cluttering: Adopt a "one in, one out" rule. For every new item you bring into the space, remove one old one. This maintains the clean, organized layout you worked hard to create.
3. Use Lighting to Set Mood and Function
Proper lighting is one of the most transformative yet often overlooked interior design tips for beginners. It goes beyond simple illumination, shaping a room's atmosphere and enhancing its functionality. The key is to layer different types of light: ambient for overall brightness, task for focused activities like reading or cooking, and accent to highlight architectural features or artwork. A well-lit room feels larger, more inviting, and more dynamic.
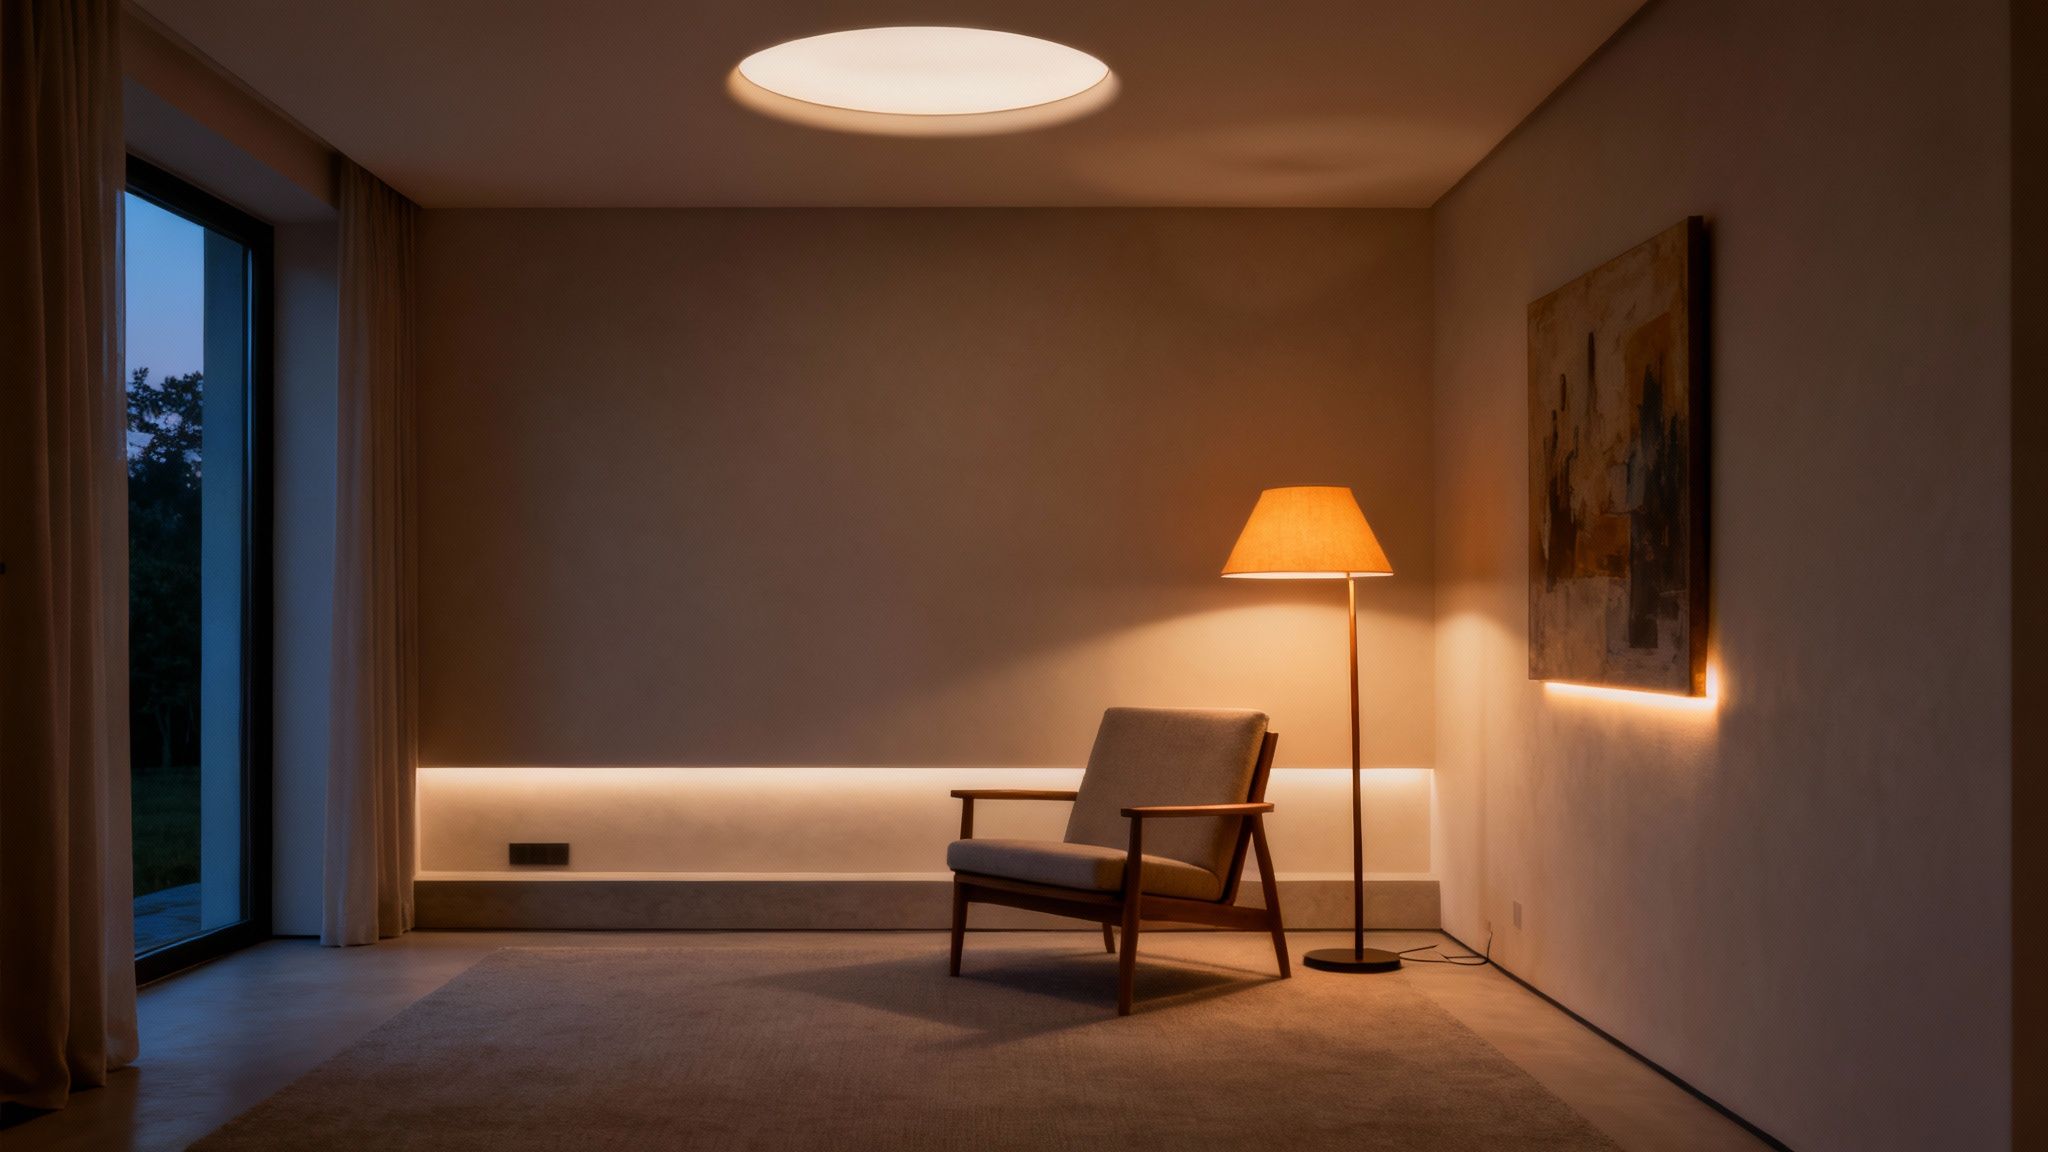
This layered approach allows you to create depth and versatility. For instance, a living room might combine an overhead fixture (ambient), a floor lamp next to a reading chair (task), and a picture light over a favorite painting (accent). This strategy ensures the space is functional for various activities while also allowing you to create a specific mood with the flick of a switch.
How to Implement a Layered Lighting Scheme
Start by assessing the primary functions of your room. In a home office, bright, clear light is essential, combining natural window light with a strong desk lamp and overhead lighting. For a bedroom, the goal is often relaxation, making bedside lamps and a dimmer switch on the main light indispensable. Don't rely on a single, harsh overhead light, as this can create unflattering shadows and a flat, uninviting atmosphere.
Visualize Before You Install
Lighting choices can be difficult to reverse, making upfront visualization crucial.
- Render with AI: Before committing to expensive fixtures or hiring an electrician, use a tool like RoomStudioAI. Its photorealistic renderings can accurately simulate how different lighting scenarios, from warm recessed lights to a modern statement chandelier, will interact with your existing space and color palette.
- Test Bulb Temperatures: Light temperature, measured in Kelvins (K), dramatically affects mood. Use warm-toned bulbs (around 2700K) for cozy areas like living rooms and bedrooms. Opt for cooler, neutral-to-daylight bulbs (4000K+) in kitchens and home offices where visibility is key.
- Consider Dimmer Switches: Installing dimmers on your primary light sources is a cost-effective way to gain maximum control over a room's ambiance, allowing you to transition from bright and functional to soft and intimate.
4. Invest in Multi-Functional Furniture
One of the smartest interior design tips for beginners, especially those working with limited square footage, is to choose multi-functional furniture. These clever pieces serve multiple purposes, maximizing utility and freeing up valuable floor space. Instead of crowding a room with single-use items, a storage ottoman, an expandable dining table, or a console that doubles as a desk offers flexibility and reduces clutter.
This approach is about making every piece work harder for you. A Murphy bed can transform a home office into a guest room, while nesting tables provide extra surface area when needed and stack away neatly when not in use. This strategy ensures your home adapts to your lifestyle, providing functionality without sacrificing style.
How to Implement Multi-Functional Furniture
Start by identifying the primary and secondary functions you need in a room. For example, a living room might need seating, storage, and a surface for drinks. A storage ottoman cleverly combines all three. In a child's bedroom, a loft bed with a built-in desk and shelving underneath is a perfect space-saving solution, an idea often seen in modern kids' room ideas. Prioritize high-quality construction for pieces that will be used frequently, like a sofa bed.
Visualize Before You Buy
Ensuring a convertible or multi-functional piece fits and functions well in your space is crucial.
- Use AI Visualization: Before committing, use a tool like RoomStudioAI to see how a piece like a daybed or a modular sofa looks in your actual room. This helps you confirm it complements your existing decor and fits the scale of the space.
- Measure Everything: Carefully measure your space, including pathways and clearance needed for convertible parts to extend. Check the dimensions of the furniture in all its forms (e.g., a table when it's both collapsed and expanded).
- Test in Person: If possible, test the mechanism of a piece in a showroom. A sofa bed should be easy to open and close, and a storage lid should lift smoothly.
5. Add Plants and Natural Elements
Incorporating plants and natural materials is a powerful yet simple way to bring life, texture, and a sense of calm into your home. This approach, often called biophilic design, connects your indoor space with the natural world, which can improve air quality and reduce stress. Plants soften hard lines and add organic shapes, while elements like wood, stone, and natural fibers introduce warmth and tactile interest.
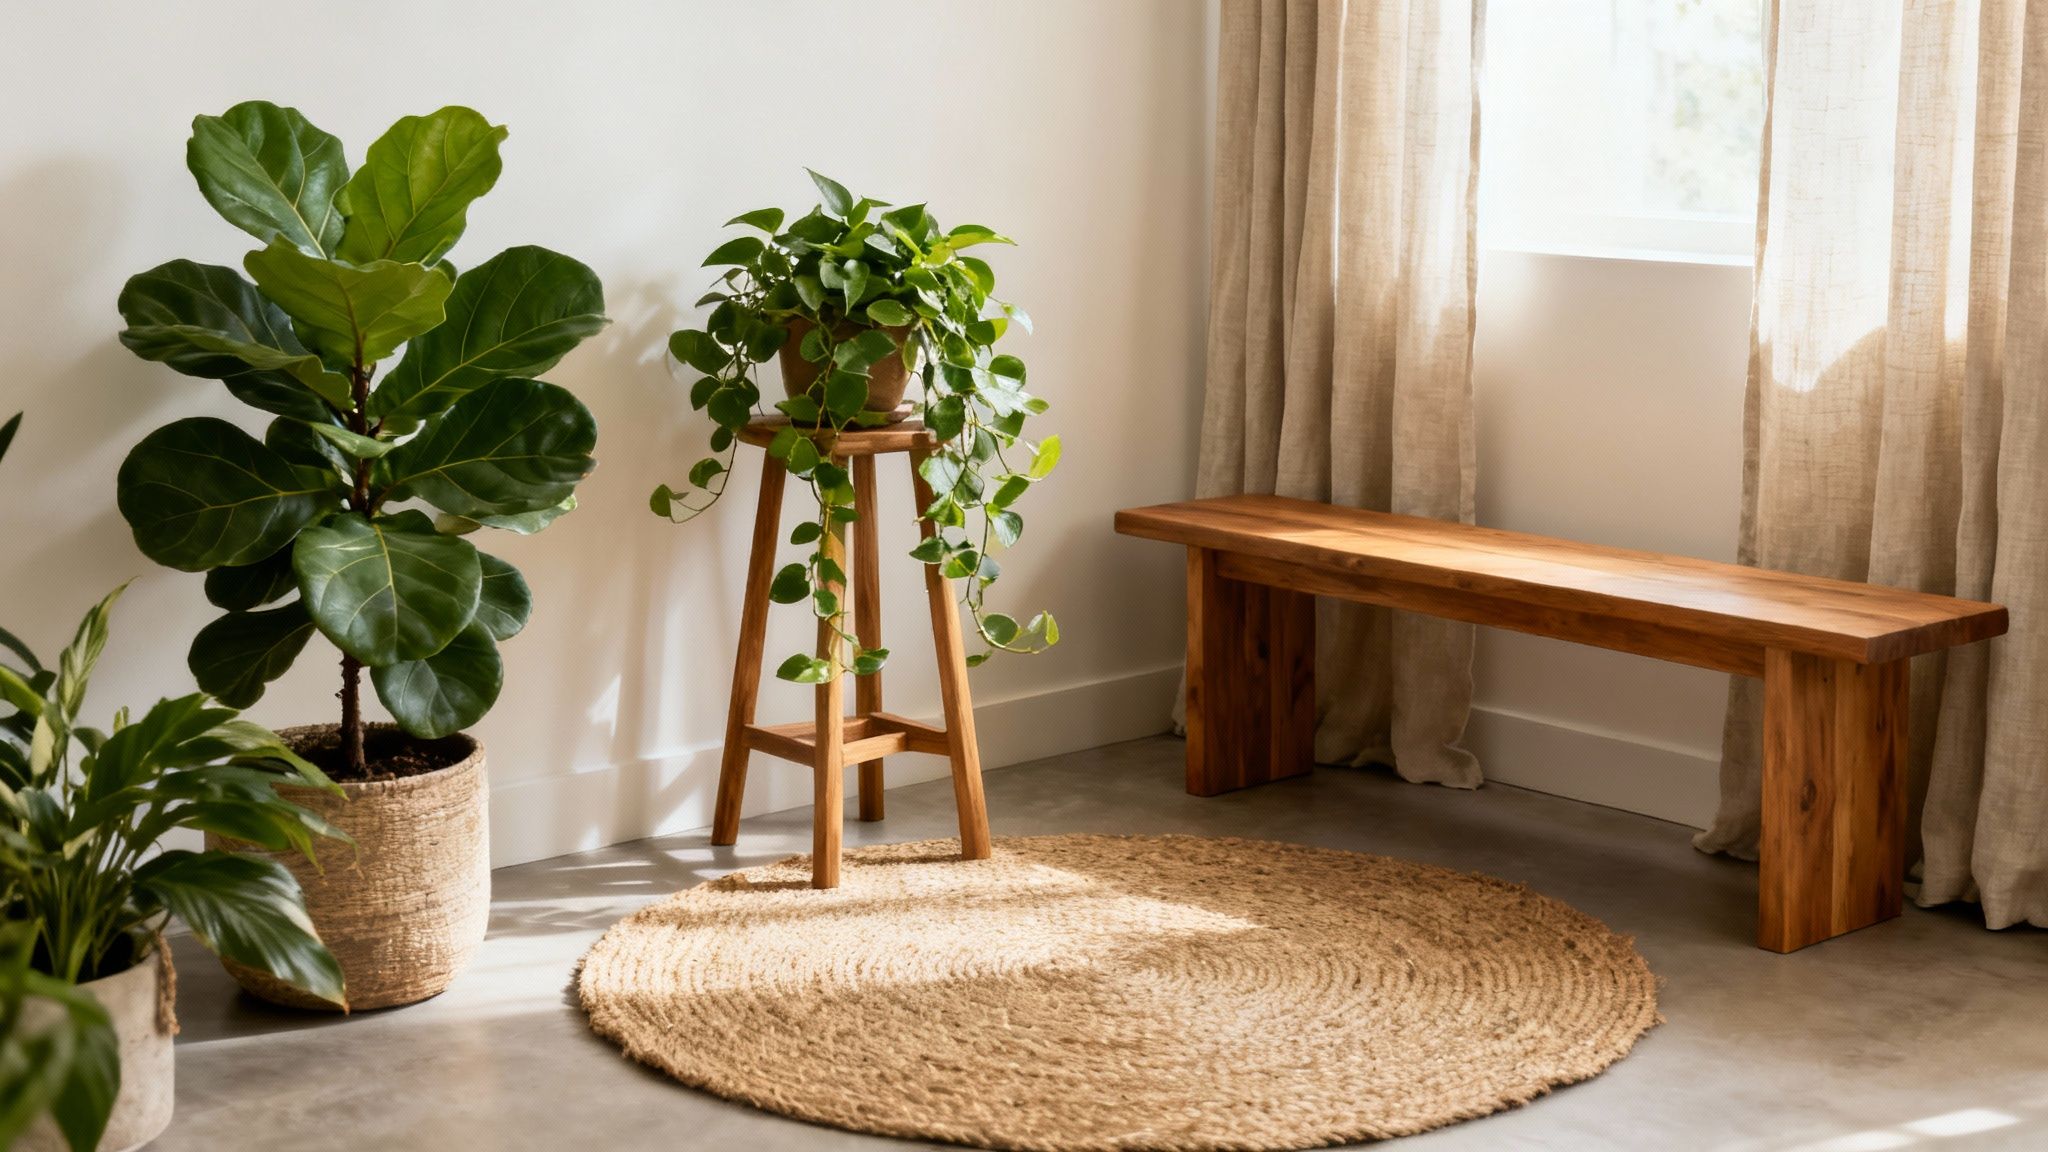
This is one of the most accessible interior design tips for beginners because it works with any style. For a minimalist room, a single Fiddle Leaf Fig can serve as a living sculpture. In a bohemian space, a collection of trailing Pothos and snake plants adds to the lush, layered aesthetic. Exploring biophilic living room ideas can offer deeper insights into creating a nature-inspired sanctuary.
How to Implement Natural Elements
Start by identifying the lighting conditions in your room. For bright, sunny spots, consider a Monstera or rubber plant. For lower-light areas, ZZ plants and snake plants are excellent, low-maintenance options. Beyond living plants, introduce natural materials through functional items like jute rugs, linen curtains, wooden shelving, or stone coasters. This layered approach creates a rich, cohesive environment.
Test Before You Commit
Visualizing how plants will fit into your layout is crucial for achieving a balanced look.
- Use AI Visualization: Before buying, use a tool like RoomStudioAI to upload a photo of your room and place virtual plants. This helps you determine the best size, type, and location for each plant, ensuring they complement your furniture and don't overwhelm the space.
- Group for Impact: Arrange plants in groups of three or five at varying heights to create a dynamic focal point. This is more visually interesting than scattering single plants throughout a room.
- Mix Materials: Combine different natural textures. For example, pair a smooth wooden coffee table with a coarse woven basket and soft linen throw pillows to add depth and sensory appeal.
6. Layer Textures for Depth and Visual Interest
Beyond color and furniture, texture is a critical element that brings a room to life. Texture refers to the surface quality of materials, influencing how a space feels both visually and physically. Layering a variety of textures-like smooth, rough, soft, and shiny-is a professional technique that adds depth and sophistication, preventing a design from feeling flat or sterile. This approach engages the senses and creates an environment that is rich, dynamic, and inviting.
A well-textured room balances different materials to achieve harmony. For instance, a living room might feature a soft linen sofa, plush velvet pillows, a rough jute rug, and a smooth metal coffee table. This mix creates contrast and interest, making the space feel curated and complete. This technique is especially prominent in styles like Bohemian decor, which you can explore in these Bohemian living room ideas.
How to Layer Textures Effectively
Start by identifying the dominant texture in your room, which is often the largest piece of furniture, like a leather or fabric sofa. From there, introduce contrasting and complementary textures through textiles, accessories, and finishes. The goal is to create a balanced sensory experience that is visually appealing and comfortable.
A Formula for Texture Balance
For a foolproof approach, follow a simple guideline to ensure your space feels balanced.
- Mix Materials: Combine a variety of materials throughout the space. Think about pairing a chunky knit throw with a sleek leather chair or placing a smooth ceramic vase on a rustic, raw wood shelf.
- Repeat for Cohesion: Repeat at least two or three key textures in different areas of the room to create a sense of rhythm and unity. For example, the metal from a lamp base could be echoed in picture frames and hardware.
- Visualize the Interaction: Use a tool like RoomStudioAI to see how different textures interact with your room’s lighting. The platform's photorealistic renders can show you how a velvet curtain catches the light versus a sheer linen one, helping you make more informed decisions before you buy.
7. Use Mirrors Strategically to Enhance Space
Mirrors are one of the most versatile and powerful tools in interior design, capable of transforming a room by manipulating light and perception. More than just a reflective surface, a strategically placed mirror can make a small room feel significantly larger, brighten dark corners, and serve as a stunning piece of wall art. This is a crucial tip for beginners, especially those in apartments, as mirrors add high impact without permanent changes.
The core principle is simple: mirrors bounce light around a room. Placing a large mirror opposite a window doubles the amount of natural light, making the entire space feel more open and airy. Similarly, in a narrow hallway or a compact living room, a floor-to-ceiling mirror can create an illusion of depth, effectively erasing a boundary wall.
How to Implement Mirrors Strategically
Begin by identifying the problem areas in your room. Is there a dark corner that needs brightening, or a small entryway that feels cramped? These are the prime locations for a mirror. For example, a statement mirror above a console table in an entryway not only adds a decorative touch but also makes the space feel more welcoming. In a bedroom, placing a large mirror on the wall opposite your window will amplify morning light.
Test Before You Commit
The placement of a mirror is just as important as the mirror itself. What it reflects is what you will see amplified in your space.
- Use AI Visualization: Before drilling any holes, use a tool like RoomStudioAI to upload a photo of your room and experiment with different mirror sizes, shapes, and placements. This allows you to see exactly how a mirror will reflect light and interact with your existing furniture, ensuring it enhances the space as intended.
- Consider the Reflection: Temporarily lean a mirror against a wall and observe what it reflects from various viewpoints. Ensure it reflects something beautiful, like a piece of art or a view from a window, rather than a cluttered corner.
- Go Big and Bold: When in doubt, opt for a larger mirror. A small mirror can sometimes look like an afterthought, whereas a large, well-placed mirror makes a confident design statement.
8. Create a Focal Point to Anchor the Room
Every well-designed room has a focal point: a primary feature that immediately draws the eye and anchors the space. Without one, a room can feel scattered and visually confusing, leaving your gaze wandering without direction. Establishing a clear focal point is one of the most impactful interior design tips for beginners, as it provides a natural starting point for arranging furniture and decor, creating a sense of order and purpose.
Common focal points include architectural elements like a fireplace or a large window with a scenic view. However, you can also create one with a bold piece of art, a statement piece of furniture, or an accent wall. The key is to select one dominant feature to prevent visual competition and ensure a harmonious layout.
How to Implement a Focal Point
Start by identifying the room's most compelling natural feature. If your living room has a beautiful fireplace, arrange your seating to face it. If your bedroom has a large window, position the bed to frame the view. In a room lacking architectural interest, you can create your own focal point. A gallery wall behind a sofa or a dramatic chandelier over a dining table instantly commands attention.
Test Before You Commit
Visualizing how to best emphasize a focal point is crucial for a successful design.
- Use AI Visualization: Upload a photo of your room to a tool like RoomStudioAI and experiment with different focal points. See how a bold, dark accent wall behind your bed looks in a Modern Minimalist style, or test how arranging furniture around your bay window enhances a Coastal aesthetic.
- Enhance with Lighting: Use accent lighting, such as a picture light over artwork or sconces flanking a mirror, to draw more attention to your chosen feature.
- Arrange Furniture Strategically: Position your largest furniture pieces to either face or frame the focal point, guiding the flow of the room and reinforcing its importance.
9. Choose Appropriate Scale and Proportion
Understanding scale and proportion is a critical interior design tip for beginners that separates an amateur space from a professionally designed one. Scale refers to how an object’s size relates to the room, while proportion is about how different objects in a room relate to each other. An oversized sofa can overwhelm a small apartment, just as a tiny rug can get lost in a large, open-concept living area. Mastering this balance ensures every piece feels like it belongs, creating a comfortable and visually harmonious environment.
This principle is about creating a sense of equilibrium. For example, a living room with low ceilings will feel more open with low-profile furniture like a sleek, horizontal sofa rather than a bulky, high-backed one. Getting the scale right makes a room feel both functional and aesthetically pleasing.
How to Implement Scale and Proportion
Before buying anything, measure your room’s dimensions, including ceiling height and doorways. A large, beautiful armchair is useless if it won’t fit through the door. Next, create a rough floor plan to map out furniture placement, ensuring there are clear pathways for movement. As a rule of thumb, leave at least 18 inches between a coffee table and a sofa to maintain comfortable flow. Balance a large item, like a substantial sectional, with smaller pieces like a slim floor lamp or a delicate end table.
Test Before You Commit
Visualizing how new furniture will fit within your existing space is the hardest part, but technology makes it easy.
- Use AI Visualization: Tools like RoomStudioAI offer photorealistic renders that maintain your room’s exact proportions. You can upload a photo and experiment with different furniture layouts to see how a king-sized bed looks in your master bedroom or if a certain dining table is too large for your breakfast nook. This eliminates expensive guesswork.
- Create Physical Outlines: Use painter's tape or flattened cardboard boxes to mark out the footprint of potential furniture on your floor. This low-tech method helps you physically experience how much space an item will occupy.
- Balance Heights: Vary the heights of objects to create visual interest. Pair a tall bookcase with a lower armchair or place a floor lamp next to a shorter end table to guide the eye around the room.
10. Personalize with Thoughtful Accessories and Styling
Accessories are the final layer that transforms a well-designed house into a personal, lived-in home. Items like artwork, throw pillows, rugs, and plants are the finishing touches that inject your personality into a space. Rather than being random afterthoughts, strategic styling of these elements should reflect the cohesive design established by your color palette and furniture, making them some of the most impactful interior design tips for beginners.
These details are also the most affordable and flexible way to refresh a room or experiment with new trends without committing to large purchases. You can easily swap out pillows or rearrange a bookshelf to completely alter the room's mood. For example, a styled coffee table with a book, a plant, and a decorative object creates a curated focal point, while a gallery wall can showcase a mix of personal photos and art.
How to Style Accessories Effectively
Start with the design framework you've already established. Choose accessories that fit within your color palette and overall style. For instance, if you are aiming for a cozy, inviting feel, layer textured throw blankets and pillows in complementary colors. A key principle is to group items in odd numbers, like threes or fives, as this is more visually appealing and dynamic than even-numbered groupings.
Test Before You Commit
Visualizing how different accessory arrangements will look is crucial to avoid a cluttered or mismatched appearance.
- Use AI Visualization: Tools like RoomStudioAI allow you to experiment with different accessory combinations in your actual room. You can see how a minimalist bookshelf arrangement compares to a more eclectic one before you start buying or rearranging.
- Gather Inspiration: Use RoomStudioAI's visual search feature. If you find an inspiration image with accessories you love, you can use the tool to identify similar items and find where to purchase them.
- Leave Negative Space: One of the most common mistakes is over-accessorizing. Resist the urge to fill every empty surface. Negative space gives your curated items room to breathe and makes a stronger impact.
10-Point Interior Design Tips Comparison
| Tip | 🔄 Implementation complexity | ⚡ Resource requirements | 📊 Expected outcomes | 💡 Ideal use cases | ⭐ Key advantages |
|---|---|---|---|---|---|
| Start with a Color Palette | Low–Medium — simple rules (60-30-10) but needs color sense | Low — paint samples, digital tools (RoomStudioAI) | Cohesive, harmonious room; fewer mismatched purchases | Whole-room refreshes; beginners; establishing style | Creates visual harmony; speeds decisions; budget‑flexible |
| Declutter and Arrange Furniture for Better Flow | Medium — decision-making and physical rearranging | Low–Medium — time, storage solutions, possible repairs | Rooms feel larger, safer, more functional | Small rooms, high-traffic areas, staging | Improves flow and function; inexpensive vs. replacing furniture |
| Use Lighting to Set Mood and Function | Medium–High — layering and possible electrical work | Medium — fixtures, bulbs, dimmers; possible electrician | Dramatic mood change; improved task performance and color rendering | Living rooms, home offices, bedrooms, highlighting features | High impact transformation; flexible for multiple activities |
| Invest in Multi-Functional Furniture | Low–Medium — measuring and selection effort | Medium — cost varies by quality; may need modular pieces | Space-saving; increased utility without clutter | Small apartments, multi-use rooms, temporary living | Maximizes function; reduces number of pieces; versatile |
| Add Plants and Natural Elements | Low — basic plant care and material selection | Low–Medium — plants, pots, natural materials | Warmer, textured spaces; improved air/mental well‑being | Any room; biophilic or natural styles; softening hard edges | Affordable color/texture boost; wellness benefits |
| Layer Textures for Depth and Visual Interest | Medium — balancing textures for cohesion | Low–Medium — textiles, rugs, finishes | Richer, more sophisticated visual depth without extra furniture | Living rooms, bedrooms, cozy or luxury looks | Adds sensory appeal; elevates design affordably |
| Use Mirrors Strategically to Enhance Space | Low — placement planning | Low — mirrors range from inexpensive to statement pieces | Brighter, larger-feeling spaces; highlighted focal points | Small rooms, dark corners, rentals, entryways | Cost-effective way to increase light and perceived space |
| Create a Focal Point to Anchor the Room | Medium — identify or create and commit | Low–Medium — artwork, paint, lighting, or architectural tweaks | Organized layout and stronger visual direction | Rooms lacking focus; living rooms, dining areas, bedrooms | Guides furniture arrangement; draws attention away from flaws |
| Choose Appropriate Scale and Proportion | Medium–High — measuring and visual planning | Low–Medium — may require custom or specific-sized items | Balanced, functional spaces; avoids overwhelming or lost pieces | Any room when replacing furniture or reconfiguring layout | Prevents costly mistakes; creates harmonious spaces |
| Personalize with Thoughtful Accessories and Styling | Low–Medium — curation and restraint needed | Low — accessories are generally affordable | Personalized, lived-in feel; easy seasonal refreshes | Final styling, rentals, trend trials, layered looks | Most affordable upgrade; easily changeable and expressive |
Bringing Your Vision to Life
Embarking on your interior design journey can feel like standing at the base of a mountain, but the summit is more accessible than you think. You are now equipped with a powerful toolkit of foundational principles and actionable strategies. Moving forward, the key is to view design not as a rigid set of rules, but as a creative process of discovery. This article has provided a comprehensive roadmap, and now it's your turn to take the wheel.
Key Takeaways for Lasting Impact
As you begin to apply these concepts, remember the core ideas that will consistently guide you toward successful outcomes. The journey from a novice to a confident home stylist is built on understanding these fundamental pillars.
- Function First, Form Follows: Always begin by considering how you use the space. A beautiful room that doesn't support your lifestyle will quickly become a source of frustration. The most effective interior design tips for beginners are those that marry aesthetics with practicality.
- The Power of a Plan: Resist the urge to make impulsive purchases. By starting with a clear color palette, a defined focal point, and a thoughtful furniture layout, you create a cohesive vision that simplifies every subsequent decision.
- Layers Create Character: A truly captivating room is never one-dimensional. The interplay of lighting, the richness of varied textures, and the strategic placement of personal accessories are what transform a space from a simple container into a dynamic, inviting home.
Your Actionable Next Steps
Knowledge is only potential power; action is what brings your vision to life. Don't let overwhelm paralyze you. Instead, focus on small, manageable steps that build momentum and confidence.
- Choose One Room, One Goal: Start with a single space, like your living room or bedroom. Then, select one tip from this list to implement. Perhaps you'll begin by decluttering and rearranging furniture for better flow, or maybe you'll focus on creating a focal point around your favorite piece of art.
- Experiment Without Risk: Before committing to paint colors or expensive furniture, leverage technology. Use tools to create mood boards, test different layouts, and visualize how elements will work together. This crucial step can save you significant time, money, and regret.
- Trust Your Instincts and Evolve: Your home should be a reflection of you. While design principles provide excellent guidance, your personal taste is the final authority. Don't be afraid to break a rule if it feels right for your space. Remember that design is a journey; your home will evolve as you do.
By consistently applying these foundational interior design tips for beginners, you'll do more than just decorate a room. You will cultivate an environment that supports your well-being, expresses your personality, and enhances your daily life. This process is about empowerment, giving you the skills to shape your surroundings and create a sanctuary you are truly proud to call home.
Ready to stop guessing and start visualizing? Bring these interior design tips to life with RoomStudioAI. Upload a photo of your room and instantly generate stunning, photorealistic design concepts to find the perfect look before you commit. Get started for free on RoomStudioAI and transform your space with confidence.
Ready to redesign your space?
Try our AI interior design tool and see your room transformed in seconds.
Try Free Design

